Alright folks - time to learn something about your ears and analog stuff.
In a previous blog post I talked about loudness and how our ears perceive loudness from primarily average levels rather than peak levels. It's pretty interesting how that happens. We hear a certain frequency balance, a certain punch, a certain width (hmm...all words we use when describing analog gear) and it sounds LOUDER to us. More ALIVE.
Part of this is because of a little thing called saturation. Sure, compression helps aide in the squashing of dynamic range in order to bring up RMS level. You compress something 4dB and then bring up the makeup gain 4dB, the "apparent loudness" of the track easily went up 4dB because your peaks stayed the same (thanks to the makeup gain) but your average went up. But what about those times we DON'T want to use a compressor? When it sounds too obvious? When it pumps? What then!??!
Analog desks have multiple benefits. One of which is saturation. Another of which is routing possibilities. Another still is analog summing. A Big trend these days is to use analog summing mixers like the Dangerous 2Bus. This product allows mixers to send out of their DAW into an analog box that sums using components, all analog, like an analog console does. However, these boxes are usually 16 channels. An analog console is usually much larger. 24, 48, 64, 96 input boards are common. This means that you have to do digital summing in the box to get the mix down to 8 stereo groups (i.e., 16 mono outs) anyway. On a real analog console, it's easily one track per fader.
So what makes analog summing better? I used to think it was some mythical thing about width and depth and blah blah. What I've learned (at least what I THINK is happening) is the subtle saturation characteristics from each channel adds what I call a "tightening and heightening" effect. It tightens up the low end thanks to its saturation (i.e., saturation from transformers / circuitry) and it sort of livens it up due to the harmonic content added by the saturation circuitry. It's subtle. You may not notice it on a track by track basis. However, when added up together, it's sort of like the Lombard effect - people in the pub talk louder and louder as they slowly can't hear themselves over each other, and soon enough the loudness of the room is extremely obvious. Little bits add up quick.
To prove my point, take a listen to these two drum clips.
DRUM CLIP A:
http://www.theclosetstudios.com/Drumtest-A.wav
DRUM CLIP B:
http://www.thecloststudios.com/Drumtest-B.wav
Which one of these sounds more like the "analog characteristics" we talked about? More punch, apparent loudness, and width?
If you put them side by side in a DAW and play them, you will notice a few things. First, Clip A sounds a bit louder, wider, and has more depth. Listen to the room sound on clip A - it's more apparent! You hear more of the snare in the room. Now look at the meters - Clip A is 4dB QUIETER than clip B. On my meters, Clip A is -9.4 dBFS and Clip B is -6.0 dBFS.
Why does Clip A sound bigger, wider, and deeper, but it's over 3dB quieter?
Answer: ANALOG SATURATION.
Clip B was the original drum bus render. I ran it through some analog preamps and drove the transformers fairly hot. No EQ or compression, just natural saturation from analog preamps. This decreases the peaks, bringing up the harmonics and saturation, and allows for the natural compression (without pumping) to take place. This in turn yields a fuller, more balanced drum sound.
So, then after you do that, turn up Clip A 3.4dB to match the peak levels of clip B. Now guess which one is still louder? Haha...much more obvious that time.
Crest Factor is a term that means "the different between the highest peak level and the RMS level." So if your mix peaks at -1.0dB and your RMS level is -11dB, you have a crest factor of 10. Most modern standards suggest that anything more than 20dB is a super dynamic mix. Many modern rock mixes have crest factors of around 5-8dB. It is very likely that if you did a mix on an analog console and tracked to tape, your mix (DRY) would have a natural crest factor of maybe 10-12dB BEFORE compression, and a digital one may have 20+dB before compression. It is in this way that digital mixers often have to add more compression than analog mixers to compensate for this.
The solution: If you're wanting the Analog sound (like many of us are), use a healthy balance of saturation and compression. If you only use saturation, your mix will likely be out of control and probably gritty and overdriven. If you use only compression, your mix may have no edge, and instead pump and breathe in weird ways - it will sound smaller and wimpy rather than in your face.
Find a balance between saturation and compression and you will surely improve your mixes.
So the verdict on analog's depth? I don't think it's some magical "stereo widening" effect or some crazy "depth creator" even though we use the terms like "more width" and "more depth" from analog. Why is that though? I truly believe it's because of the aforementioned "tightening and heightening" effect of analog. Single tracks, entire mixes, it was obvious in the drum clip I send you above.
Another thing to think about - these days we are often using smaller rooms for recording (as many large studios have gone out) and then having to create ambience later. By running through analog gear post mix and driving it, we are essentially compressing it via saturation. When you compress something with ambience, the ambience is brought up. Note the drum example! Those were done in a big room with lots of compressed room mics. When you run it through analog, the room sound gets compressed too, making it much more obvious. This I believe is what makes a lot of "analog" mixes better. We used to record more room mics, more "real space" and now we don't, we use it on FX sends.
Another one of my solutions for this? Don't do aux sends for your room sounds. Plates, chambers, delays, sure --those have very often been aux sends. But for room sound - if you want the recording to sound REAL like it was REAL ambience recorded on those drum tracks, put the reverb ON THE TRACK. Come on, your computer is powerful enough to do that. That way when you compress them, it will react like it really would have in the analog days. Real room sound to a compressor. Sending a compressed drumkit to a room is nowhere close to compressing a big drum room stereo pair and blending it in. TRY IT.
In my opinion, the inserted reverb sounds more ALIVE. More REAL. I've been working on a book / DVD about recording and mixing for ITB and this is one of the biggest chapters in there - understanding ambience! It's not just "reverb," it's supposed to be PART of the sound. Sending the mics to an aux does very little for us. It doesn't make the room part of the recording. It makes it an effect. It doesn't make the sound quality of a space apart of what affects our EQ and compression decisions, which I 100% believe it SHOULD.
Doing it this way also allows you to be more tactile with mix. You need more verb? Turn up the ROOM MICS. Not "reach for an aux." It's more natural. Easier to remember, also.
Take these things into consideration, and have a safe new year.
Friday, December 30, 2011
Tuesday, December 27, 2011
Mixerman Quote
LOVE these tidbits from Mixerman....it could be pure genius at a momentary break in the song, and pure crap everywhere else."
"So if you bring up a part and it does nothing good for the track, provides no worthwhile counter-melody, serves only to distract the listener's focus from what's important, or offers no valuable rhythmic support, it's a stranded part, one that should have long ago been removed from the session. Underdub it."
"Since the vocal (or melody) is the most important part in a mix, you should make the preponderance of your tough decisions based on how a part affects the vocal"
"Remember, at all times, you're attempting to push the listener forward, manipulate their focus, and cause them to have an involuntary physical reaction to the music this will cause the listener to sing the song, which consequently will lead them to want to hear the track again."
-Mixerman
from Zen and the Art of Mixing
Seriously, buy this book:
http://www.amazon.com/Zen-Art-Mixing-Mixerman/dp/1423491505/ref=sr_1_1?ie=UTF8&qid=1325558225&sr=8-1
Saturday, December 24, 2011
Review of the URS Classic Console Strip Pro v2.0
 click to enlarge
Alright...so I picked up this baby yesterday and I must say, Whoa.
This plugin is NUTS. The idea behind it is to model the EQ / "coloration" characteristics of all these different types of input stages, compressors, and EQs, and put them all into one plugin that is a channel strip of all three. Enter URS Console Strip Pro. Though it doesn't look all that fancy, it's a great sounding plugin that does a LOT for only $300.
Jeez. Where to start.
I heard about this plugin from two main producers. One was Charles Dye, who is the first engineer to have a number one record that was completely mixed in the box. He's sort of a plugin legend.
The Plugin
Alright so let's talk about the plugin. According to the URS website, this is what all the plugin plugin models in the input stages:
- Three Class A American input transformers
- Class A British input transformer
- Class A German input transformer
- Two Class A tube input stages
- 15ips 2" tape electronics/head bump
- 30ips 2" tape electronics/head bump
- 30ips 1/2" tape electronics/head bump
- Fifteen input transformer & tape combos
- Five Console Input/Summing Buss stages
The EQ is laid out with 5 different models of EQ across 4 bands. The models are:
1951 - Pultec Style
1967 - API Style
1970 - Neve 1073 Style
1972 - Neve 1081 Style
1980 - SSL Style
The characteristics of these EQ curves really are noticeable when boosting or cutting a lot. If you set a boost in the lows or low mids to 4 or 6 dB and then switch through the different presets, you can hear the difference. It's subtle, but it's definitely there. The Pultec has a nice big bottom and smooth top, the Neves have a really tight low end and upper midrange boost, and the SSL has the classic edgy top. API doesn't really sound like the API to me, but it's still a good EQ.
You can arrange the EQ and compressor in a few ways. EQ first, Compressor first, Filters first, or all different combinations of those three. You can also bypass parts completely, or individual EQ bands only. You can link all the EQ "types" together using the Link button on the HF band. In addition to the EQ section you have the filters section for HPF and LPF, which I usually put pre compressor, and I love using them to tighten up the sound and remove any extraneous sounds I don't want to compress.
The compressor side is really what makes this thing cool. It has SIXTY presets for compression. Yes, SIXTY. This includes things like LA2, 1176, Distressor, API 525, Fairchild, VariMu, etc. I personally think that is too much, but it does allow you to get quick sounds. Apparently these are not only modeled after the EQ curves of the piece of gear, but when you open a preset it adjusts the ratio / attack / release / release type (manual or 7 different auto modes) to fit the sound of the compressor. In addition to these, you can adjust for the "faster attack" switch, adjust the knee, and the gain makeup. The one thing I dislike is that it is totally dependent on the types of models, and there is no ratio control, so you sort of have to know what you're wanting in order to get a sound without tweaking many knobs. However, some would argue this makes you use your ear more. I can see that.
Probably my favorite part about the compressor section is that in V2 of this plugin (which I have) there is a Wet/Dry mix control for the compressor. This allows you to do parallel compression in real time with no phase issues from DAWs that don't have automatic delay compensation.
Some side notes - I LOVE that this plugin has input and output meters separately, as well as a gain reduction meter. I hate having to select what I want to see on the meter, I want to see all three! MAN that makes it easy for gain staging. The plugin operates very smoothly with your mouse and keyboard. Holding control will give you large knob turns as you scroll your mouse wheel. Releasing it will give you normal precision, and holding shift will give you fine precision.
The saving grace of this plugin to me was the presets. Once I got it I was like "oh man, I have no idea where to even start." The first five presets in the plugin are modeled by year, which select all the EQs to the same year, and then select a compressor / input stage that would match that year. Then they also have tape and tube compression presets. This is a nice place to start. I don't ever get into the presets about specific sources (e.g., "Rock Kick" or "Drum Bus" presets) because they NEVER work for me. Every source is different so I just use my ear.
Overall, this plugin is a REALLY great deal for $300. It comes with a lot of amazing tools in it. I think it beats out the Waves SSL channel for me, particularly because of all its features. The compression takes a little bit to get used to, but after you find a couple of models you like, you will find it really addicting. I just wish it wasn't ugly as hell.
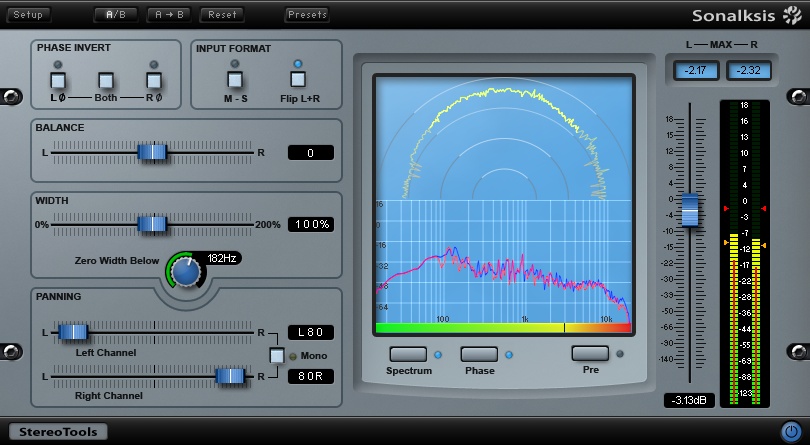
Review of the Sonalksis Stereo Tools
 (click to enlarge)
Alright, so I'm new to this brand called Sonalksis, (I believe pronounced Son-aulk-sis), which is this smaller plugin company that makes a handful of really need plugins. I recently found out about them from reading an interview with a producer I like, and I decided to head over to their website. After many hours, I ended up getting the 14 day trials for almost all of their plugins, and I ended up purchasing the Sonalksis STEREO TOOLS plugin.
This is a very simple plugin for adjusting stereo width in sources, similar to the Waves S1 or one of my personal (and free) favorite plugins, the Omnisone stereo imager by jb. However, this has a couple features that really make it shine.
First of all, there is a phase invert switch on the top left of the plugin for the Left, Right, or Both. This can be useful when dealing with any stereo pair of mics as a quick check before and after you do stereo image processing. Sometimes making the stereo image narrower will make imaging problems more obvious. You also have Mid-Side input or standard left and right, as well as a "flip left and right" button. In the main part of the plugin we have Balance (like a pan pot) and then WIDTH. Our main focus! This width has a really cool feature about it in that you can select "Zero Width Below" and you basically have a high pass filter. This is AMAZING for putting this across the stereo bus, because you can select the filter down to maybe 80 or 100hz, and nothing below that will be shifted to the outsides, they will be shunted to mono. Now this is usually not a problem because the only things that are in that region are already mono! (kick, bass, etc).
However, this becomes really cool on things like acoustic guitars, which can start to sound really weird if you make them too wide. What I have done so far is put the HPF on to maybe 100-200hz, and just let the width stay at 100%. That way, I have my normal wide stereo image for acoustic, but my low end is solid in the middle.
There is also a stereo panning section that allows you to pan the left and right channels yourself rather than just having a single balance fader. In addition, there is a Mono button that simply allows you to keep it mono.
One of my favorite parts of this plugin is that is had a great Phase scope, Frequency Analyzer, and Lissajous meter. These three things make it really useful for gauging the size and shape of the mix when placed on the stereo buss (which honestly I find that I like a whole lot!) I don't always do stereo widening on the 2bus, but I find that digital doesn't always have the width and depth that analog has, so you have to be a lot more creative with your mixing to create
My only qualm about the plugin is that sometimes it seems to take away some low end from the source, and there is no readjustment for adding low end back, which I think should be on a new update.
Aside from the Stereo Tools plug, my favorites were the Sonalksis SV314 Compressor and the Sonalksis Creative Filter. Some of their plugins I found to be difficult to use, very hard to read, too much on the screen, like their two multiband dynamics plugins. I did really like their gate plugin, but there was no Floor adjustment, which bothers the heck out of me; I never gate to zero because it sounds too unnatural.
So this is a great plugin! If you need a solid stereo imager and want something useful, check out the Sonalksis StereoTools. If you don't have the money for it, get JB Omnisone.
Monday, December 19, 2011
Balance is a Virtue
Alright so what's up with the title of the post - let's talk about balance for a minute. This upcoming RECORDING LOUNGE PODCAST episode is about getting things to fit in a mix using reverb, compression, and EQ. Figured I'd share a story about this.
The time was last week, some late weeknight, and I'm working on a mix. At that time I had drums and bass grooving together, guitars starting to work, and the vocals in the verses. I kept looping the verse and working on that and it sounded awesome. Eventually I got to a point where I said, man I love this verse. Time to move on to the chorus. The chorus had a different selection of certain parts (different guitars, different pads) so I was trying to mix those all in with the already solid drums and bass.
The problem I began having was that the chorus just did - not - work. I kept blaming the parts. This guitar part isn't working, so I'd mute it and then the chorus would sound empty. Then I thought, okay maybe it's just too loud, so I turned it down. Then that didn't work. So then I started messing with the EQ. The part I was really having trouble with was this guitar part that was subtle but added a lot to the chorus live. When it was recorded, it just was not working.
I decided to take a different approach. I muted the guitar part and just listened to the chorus. Nice pretty highs, nice powerful lows, but the mids seemed to be a bit empty, and it was primarily in the 400-1k range, which we generally think of as boxiness. It wasn't that I had filtered out too much on other instruments, it was just like someone in the band wasn't playing that was supposed to be - that's literally how it sounded!
Now, this guitar part was sort of a chimey guitar that sounded amazing on its own, but in the mix just didn't work. What I decided to do was reamp the guitar part through a wah pedal and a dark tube amp and got this dark murky filtered sound with virtually no top end and very little bottom end. When put back in the mix, the chorus sounded amazing.
Why was that? Well, when I listened to the chorus without the guitar part and liked the balance but it seemed to miss something in the mids. The guitar part was chimey so lots of pretty highs and beautiful bell like high mids. But no body. Darkening it up with the wah did change the band's "intent" of that part, however, it made the chorus really gel together. It taught me something really great about balance.
Moral of the story: balance is not an individual track by track feat. It's not all about volumes (loud and soft) and pans (left to right), it's also about depth (front to back) and microdynamics (percussive performance vs. smooth performance) as well as tonality (EQ and part selection). When you listen to songs or sections of songs, try to listen to what is "missing" in the section's makeup. If nothing is missing, you are very likely to love that section. If something is missing, it may be some gap in the highs or in the lows, maybe the bass part changed or the guitar part is weird and now there is a gap in the low mids and mids.
Try not to listen to "guitars" and "bass" and "drums" but instead listen for the EQ CURVE of the mix. Listen to what "high frequencies" are coming through as well as what "low frequencies" are coming through. Try to think of it in that way artistically and you may find your mixes changing in a great way. If you ask yourself "what's going on in the mids" you could easily list almost every track, but if you start saying "what's going on in the 500-1k region" and if there's a deficit (or a surplus) then it might sound very off.
It's not about making a mix where every frequency is represented the same volume as every other frequency. This is where the age old quote "follow the song" comes in. Each section will offer a different dynamic balance, tonal balance, and spatial balance. The more you learn to recognize these things as an artistic means to an end, the better your mixes will sound because you will mix quicker, less analytically and more creatively. Also, you will probably find yourself using less processing and EQ!
Good luck. Listen for the next podcast tonight - search iTunes for RECORDING LOUNGE
Wednesday, December 14, 2011
Loudness and Average Level
An excerpt from a favorite book of mine:
"LOUDNESS [as a term] is used specifically and precisely for the listener's perception. Loudness is much more difficult to represent in a metering system, in fact it's best presented as a series of numbers rather than as one overall figure of "loudness." Two pieces of music that measure the same on a flat level meter can have drastically different loudness[es]. A true loudness meter makes a complex calculation using SPL, frequency content, and duration. Exposure time also affects our perception; after five minute rest, the music seems much louder, but then we get used to it again--another reason why it is wise to have an SPL meter around to keep us from damaging our ears.
Contrary to popular belief, the levels on a digital peak meter have (almost) nothing to do with loudness. Here is an illustration. Suppose you are doing a direct two-track recording and you've found the perfect mix. Leaving the faders alone, you let the musicians do a couple of takes. During take one, the performance reached -4dB on the meter, and in take two, it reached 0dB for a brief moment during a snare drum hit. Does that mean that take two is louder? No: because in general, the ear responds [most] to average levels, not peak levels when judging loudness. If you raise the master gain of take one by 4dB so that it too reaches 0.0dBFS peak, it will sound 4dB louder than take two, even through they both now measure the same on the peak meter.
An analog tape and digital recording of the same source peaked to full scale sound very different in terms of loudness. If we make an analog tape recording and a digital recording of the same music, and then dub the analog recording to digital, peaking at the same level as the digital recording, the analog dub will have about 6dB more intrinsic loudness than the all digital recording. Quite a difference! This is because peak to average ratio of an analog recording can be as much as 12-14dB compared with as much as 20dB for an uncompressed digital recording. analog tape's built in compressor is a means of getting recordings to sound louder. That's why pop producers who record digitally may have to compress or limit to compete with the loudness of their analog counterparts."
-Bob Katz, Mastering Audio: The Art and the Science
Monday, October 31, 2011
Review of the AVENSON STO-2 Omni Microphones

WOW. So I just picked up these weird little Avenson Audio STO-2 microphones. Originally heard about them from a forum friend mentioning them used on Overheads with great success. This is the type of "friend" that would usually use 414s, Coles ribbons, or 251s on overheads, so I was like, "uhhh...why are you using this $550 pair of mics when you could be using a $20,000 pair?" I was a little skeptical at first, especially considering their aforementioned price - $550US for a pair. However, I kept hearing about it and did some more research and finally picked up a pair.
They come in this beautiful cedar case and are built well. They're weird little mics, reminiscent of Earthworks, Naiant, and other mics of that sort. They are omni capsules and they're very tiny capsules at that. At first thought you might think "man I bet the low end on those sucks" as the diaphragm is so small it's like, how could it possibly get all that good low end goodness?
What I found was quite shocking. These little mics are actually very neutral sounding, in fact, almost a little bit dark! Such a surprising outcome considering the bright nature of most modern microphones. I first tried it on stereo acoustic guitar. Did a simple setup, 3:1 style spaced mic'ing running through some Vintech pres with no EQ. The results were impressive. Very smooth top end, NOT HYPED at all, not brittle or tinny. I played three different levels of guitar - quiet, average, and heavy strum. In the mix, I probably would have added some top end to the quieter strummed parts, maybe even the normal playing, but the heavy strum was great! Nice and smooth transients.
I flipped the mics over and tried them as drum overheads, again a simple spaced pair. WOW did these pick up the toms great. I was really expecting this to be the mic's weak spot - saying to myself "alright, it can do an acoustic guitar mic'ed up close, but can it deal with toms and kick drum low end without making it boomy and muffled?"
Well, it did. It sounded great, again very natural and smooth. Again, a little on the dark side, which depending on the type of song it could very well fit just fine. However, I decided to add a bit of EQ to the mics to observe how they took processing - i.e., you start boosting and all of a sudden you realize how terrible the high end on the mics really is. Yet once more I was pleasantly surprised. These mics EQ like ribbons sometimes do - very easy to boost and cut here and there without exposing weirdness in the tonality of the mic. I was able to easily bring out the crack of the snare and the zing of the cymbals, and it still sounded great afterward, go figure.
My favorite part about these mics is how they respond to the transients - both acoustic guitar and drums have some serious sharp transients at some times. These mics performed famously, softening them up, making them nice and natural, if not a little bit tamed. I found it to basically outpreform most all of my "go to" microphones on heavy strummed acoustic guitar, and my collection for this source includes 414s, Neumann KM184s, AKG 451s, some expensive tube mics, and some ribbons. It was smoother, more neutral sounding, and just easier to keep in control. Side note: This mic I found to be most opposite of the AKG 451, which is a very hyped, bright and clear sounding microphone. GREAT for Martins and darker guitars, quieter guitar parts, and quiet drummers. Almost no self noise. This mic, however, its warmer, smoother top, not hyped, and a little noisy -- which leads me to my next point...
Everyone on the net gripes and worries about ONE feature of this mic - its self noise. Technically speaking, the mic has a very high self noise. However, when I tested the mic on acoustic guitar and drums, the only time I even NOTICED the noise was in the "quietly played" acoustic guitar, and even then it's pretty minimal compared to the sound. It's noticeable, especially on long held out chords, super quiet finger-picking patterns, etc., but anything strummed normally, or even remotely quiet, it will mostly be irrelevant. And I can tell you, if this acoustic guitar was going in a mix of vocals and other instruments, you better throw out your worries - you aren't going to notice the noise one bit. If you were planning on making an arrangement with finger picked acoustic guitar and vocal only, the hiss on these mics may bother you too much.
One thing that is interesting is that many of the popular plugins today (Waves API, V Series, CLA series, SSL series, etc) all have self noise by design. You can flip off the "analog" switch and remove this noise, but still the theory serves that noise is not the end of the world. Tape had hiss, and much of it than these Avensons.
All in all, SO impressed with these little mics. If you've never experienced the difference that a decent pair of SDC mics can do, you may try these, especially if you record a lot of acoustic instruments (acoustic guitar, drumkit, strings, pianos, etc).
Monday, October 24, 2011
5 Quick Tips for Better Vocal Recordings and Vocal Performances
1. WRITE GOOD VOCAL PARTS - This one seems obvious, but so many people come to the studio the day of vocal recording and don't really know what it is they want to sing. They have ideas, rough melodies, but no real structure or pattern. One of the worst things a vocalist can do is be all over the place in a song, so much so that nobody (including the singer!) can remember what was sung. The vocal is very important, especially in pop, country, and rock music. If it's difficult to sing, that's fine. If it's difficult for your fans to hum, you're probably trying to hard.
2. PRACTICE - Before coming to record, make sure you have practiced your [well written] parts many times. One thing that really helps is to actually gig with the songs before you record them. If you haven't gigged with the song yet, you may not really know what it's like to perform it all the way though when the pressure is on. This is what you will have to do in the studio essentially, so if you come without having that experience, it may feel awkward and you may tense up.
3. MAINTAIN YOUR VOICE - This is mainly about taking care of your physical voice! People that are often sick should be extremely careful to come into the studio NOT SICK! Changes in vocal timbre due to illness are very obvious. Get plenty of rest before you come into the studio, and don't warm up too long. Usually 15-30 minutes is a perfect warm up time for most singers. If you come into the studio and your throat feels like it's coated, you can try drinking some water, and if that doesn't work, try a shot of Crown whiskey. Trust me, this isn't so you can get plastered and magically nail the take; whiskey has such a high alcohol content that it can really clear out your throat and nasal passages, making it much easier to sing. I've had some singers sound terrible and then drink a shot or sometimes just a half shot of Whiskey and their voices are cleared out and their throat feels more open.
4. AVOID "BAD FOODS" - Singing on a full stomach is hard, especially on stage. It's best to eat light before gigging or recording, and avoid all dairy products if possible. Some of the best things to eat on days where you sing include apples, meats of all kinds, fish, bread, veggies, and lots of water. Avoid citrus fruits and bananas, as well as sugary foods. Stay light on the beer as it will make you bloat and feel uncomfortable, and probably sing worse in the end.
5. RELAX AND ENJOY YOURSELF - If you're not enjoying yourself, it will probably translate and be very obvious to the crowd. If you don't like the song, figure out what you need to change so you can love it, or just ditch the song altogether. Being tense and nervous before a gig or before recording can kill the mood. The best takes and performances happen when singers release all their energy and really sell the message of the song. Emotion is priority #1!
A few videos of amazing singers to inspire you:
Wednesday, October 12, 2011
29 And Hearing for the First Time!
http://www.youtube.com/watch?v=LsOo3jzkhYA
Moral: Don't take your hearing for granted!
Moral: Don't take your hearing for granted!
Tuesday, October 11, 2011
REVIEW OF THE WAVES CLA CLASSIC COMPRESSORS
So, I picked up these compressors recently. I had been really hesitant to actually get them as I usually don't buy into hype from people and internet, all of these know-it-alls saying "oh it is the best" or "it doesn't sound like the original at all." The point is, I was looking for good compressor plugins. If they happened to sound like the real thing, great. If not, then whatever. Are they usable to me? Do they move me? Do they help me mix? Do they make my job easier?
In a word, yes.
The truth put simply is that they are great plugins that are low latency, low CPU, sound amazing, cover so much ground, and they're simple. Sounds great, right? Well that's the point! You don't want to get too lost in turning knobs forever to get a sound. You want standard controls. Attack. Release. Ratio. Sometimes even simpler---the LA2 and LA3 have input and output with fixed attack/release/ratio just like the originals. They are versatile plugins and I find them to be quite enjoyable to mix with. I am always looking for solutions that make mixes more exciting and enticing. One of the least enjoyable parts of mixing ITB is staring a screen for 12 hours and tweaking with numbers and "knobs." Aside from looking great, these plugins work simply and effectively.
I've had the pleasure of working with real Urei 1176s and LA3s. Never an LA2 oddly enough, and never a blue stripe 1176. Regardless, my main goal as I said was to get plugins that I liked that worked for me. These plugins are very usable, very user friendly, and to my ear, sound very close to the hardware, the LA3 especially. They all sound really great. For me, I use them on the following:
1176 Black - Drums of ALL kinds, acoustic and elec Guitars, Bass, Piano, sometimes vocals
1176 Blue - Any time I want the Sources in the BLACK 1176 category to sound a bit warmer.
LA2 - Vox, Clean Guitars, Leads, Synths, Strings, sometimes Kick Drum
LA3 - Acoustic guitars (definitely), elec Guitars, some Vocals, some Basses, Toms
Notice anything? They can be used on almost the entire mix. These plugins cover a LOT of territory and can help you get your mix going quickly. They work great, they sound great, and in the long run, are DIRT CHEAP! $400 for these? You've got to be joking. A local studio where I work sometimes has an original LA3 that would go for $2000 on Ebay, and we have considered selling it because the plugin sounds just as good. Really.
I'm a picky guy, and I'm not endorsed by Waves to say any of this. I don't care "how close" it sounds to the original, and I don't care "how close" it compare to the UAD version or the blah blah blah version. The point is, they work for me in all the ways I want them to, and that's awesome! You should really invest in them if you want some improvement in your mixes. Kudos Waves.
Monday, October 10, 2011
5 Quick Tips for Better Guitar Tone

Here are my five quick tips for better guitar tone, no matter WHAT genre!
1. Maintain Your Instrument and Rig
Keep your guitar set up well, new strings, well intonated, tuned, cleaned, wired correctly, and working efficiently. It's SO worth the extra $50 to get it set up at your local guitar store every month (or LEARN how to do it yourself!) Change your strings often and keep your neck clean. Have nice cables, clean connections, and a well maintained amp. Keep your pickups at the right height (which is usually really darn close to the strings, but not necessarily as close as possible). Locking tuners and GraphTech nuts help you stay in tune. Think about it! So many variables...
2. Play at the right Height
I don't care how cool you look for playing low, the truth is, the higher you hold your guitar, the easier it is to play. Find a good height that works for you. Things to watch out for - pick strumming differences when playing lead and playing rhythm, wrist positioning, and relaxed shoulder/hand. How does this get you better tone? It helps you strike the strings at the right angle and helps you press with your fretting hand with the right tension and strength. This allows you to relax more when you play, and thus, enjoy yourself. Relaxed players = happy players. Happy players = better players.
3. Use a pick that works for you
Don't just find a pick and settle with it! Use a pick that works for you and your genre. Some prefer lighter picks (not my cup of tea) others prefer heavy picks. I think in my experience, rock players play best with .70 - 1.0, Metal and or lead players best with 1.0-3.0, and acoustic players anywhere from .50 to 2.0 depending on heavy you strum! A general rule - heavy strum/lighter pick, lighter strum/heavy pick. Using the right pick can drastically change the way your tone is produced, definitely on electric and especially on acoustic guitar.
My favorite picks are custom made picks from Red Bear Trading Co. They are expensive but last for months and months without dulling, and they sound better than any picks I've ever used.
4. Practice, and Practice with a Metronome
You can't get better if you don't practice. So do! Practice and practice with a good metronome. If you can't play with a met you will have a hard time getting good, a hard time getting studio work, and a hard time getting in a good band. You need to know how. The more you practice and play with a met, the better your ear's natural metronome will be and you will naturally play in time better.
5. Get a Tube Amp
Not much to say about this one. Get a tube amp. I've got 10 of them and they will forever sound better than solid state amps. Your favorite guitarists DO use tube amps -- look it up. Page, Hendrix, Mayer, Clapton, Vai, Petrucci, Paisley, Knopfler........
If you don't have a tube amp, get one. It will change your world, really. If you do have a tube amp, keep it maintained and make sure you get a good one. Some of my favorites include Hiwatt, Bad Cat, Dr. Z, Top Hat, Splawn, Divided by Thirteen, and of course good old vintage Fenders.
-Kendal Osborne
Recording Lounge Podcast
The Closet Studios
www.theclosetstudios.com
Friday, September 16, 2011
Panning and Weird Stuff
So, I just did a show about panning and LCR mixing. I prefer to mix with only three main pan spots, hard left, hard right, and center. Every now and then I find pan spots for other things, like when a drummer has lots of toms, but even then it will probably still be 50% left, 50% right. I do this for three main reasons:
1. Keeps the mix wide and have definite space.
2. Keeps the mix focused and easy to interpret.
3. Balances in level are easier to maintain (this about this one!!!)
4. Keeps me mixing quickly and efficiently!
5. Makes reverbs and delays much easier to fit in!
I'll give a short explanation.
1 - With LCR, you really use the full spectrum and have to make decisions about what is most important (which usually goes center). Things like lead vocal, kick, bass, maybe even acoustic guitar or the main rhythm element. These are usually all center. Other things like guitars, backing vocals, drum overheads, etc., can be panned hard.
2 - People understand Left, Center, Right. It's hard sometimes when mixes have too much in the "in-between" pan positions because it sounds too busy. Putting things LCR really allows you to evaluate what's important!
3 - Let's say something was hitting 0dB and panned center. If it's panned left, its apparent volume shifts up 3dB. This is because it's now only coming through one speaker. It's the same loudness, but it's only in the left year. So, essentially panning something 50% left means it apparently adds 1.5dB of level. Now think of all the in between spots...it's going to be very difficult to try and balance all of these different random pan spots. Especially if you have a mix that has some things 50L, 33R, 14L, 77R, etc.... Having LCR and 50/50 makes it easier to keep balances in the Left-Right spectrum!
4 - I believe mixing quickly is a GOOD thing. Spending too much time on a mix usually leads to a mix that is way overdone, way over produced, and sounds too hyped. Mixing quickly is exciting, it keeps my attention, and it makes me feel connected to the music. I want to keep that emotion as much as possible!
5 - Delays and Reverbs (especially reverbs) can sometimes take up a lot of space in the mix. When you only have L-C-R and a couple in between, you leave all that space for reverbs and delays to occupy. This I find is one of my favorite elements of LCR mixing. It really makes your reverbs and delays and spatial/phase/time based effects sound that much more obvious, which helps your mix retain clarity while still getting space.
On this whole note, I don't get why some people will pan things 80% and not just 100%. There is a difference obviously, but in the end, it's just more trouble than it's worth in my opinion. There are some people that have replaced the pan pots on their consoles with L - C - R switches! If you need more dimension, you can add delays and reverbs and things (refer to the podcast for details and audio examples!)
Enjoy your week!
Sunday, July 17, 2011
Summer's End
Hello All -
Summer is slowly coming to an end. Still very hot, and very full of things to do. I'm trying to get started teaching some recording/mixing/audio classes, and trying to get things in order for that. Got a handful of shows planned in the future. Hope you guys have enjoyed the shows thus far -- gotten some great email questions from listeners! Keep them coming. Recordingloungepodcast@gmail.com
Summer is slowly coming to an end. Still very hot, and very full of things to do. I'm trying to get started teaching some recording/mixing/audio classes, and trying to get things in order for that. Got a handful of shows planned in the future. Hope you guys have enjoyed the shows thus far -- gotten some great email questions from listeners! Keep them coming. Recordingloungepodcast@gmail.com
Tuesday, May 10, 2011
Interview with Mark Endert
Hey everyone -- next Monday the 16th, I'll be interviewing producer, engineer, and mixer Mark Endert. You may not think you know his work, but yes you do! He's mixed some great albums like Gavin Degraw's Chariot, Train's award winning album Save Me, San Francisco with the hot single "Hey Soul Sister," as well as albums and songs from Kate Voegele, Maroon 5, Phantom Planet, Vertical Horizon, Madonna, the Fray, Dave Barnes, Chris Tomlin, and more! This guy is a monster mixing engineer, so if you have any questions for him, please leave them in the comments or email them to me at recordingloungepodcast@gmail.com
I have a slew of my own questions, but I'll try to answer others you may have! Look forward to the show being posted on iTunes next week.
-K
I have a slew of my own questions, but I'll try to answer others you may have! Look forward to the show being posted on iTunes next week.
-K
Thursday, May 5, 2011
Recording with EQ / FX?
We've been talking about recording/mixing drums, and especially the big topic of the last few shows has been "the chain" meaning source > room > mic > pre. We've been talking about using EQ to tape (or...to disk) and the decisions you have to make on the fly. I thought I'd expound upon that point I was talking about in the podcast...
Why is everyone so afraid to record with EQ? It's a great thing. If you're in the studio, there's no time to be sitting around on your butt hating the way things sound. If you're using a console, tweak the EQ a bit, add a delay, add a chorus, whatever, and if you like it, keep it, record it that way. A prime example of this is kick drum. Even though we don't like it, almost every kick drum in rock music will need some serious EQ to get it to sound how we want it. Not all the time, but most of the time we need some real surgery, you know? Taking out mids, boosting lows or accentuating highs or whatever. If you had a couple of Neve modules (or...if you're not using that, maybe Vintech, maybe Toft...maybe just Mackie! that's not the point!!!) you could cut out some of that junk and get the song sounding a bit more exciting. It keeps the mood up in the studio, it keeps people loving the punch, without having to sit and EQ a bunch in the box to try to impress them. Record it that way and keep it! Make a decision and own up to it.
Another reason (this is primarily what we talked about in the episode on the Chain - I believe ep.12) if you EQ beforehand, it can really help your processing. For example, using high pass filters and or low shelving EQ can tighten up your low end before hitting compressors (a GOOD THING) so you're actually compressing the part of the signal that you want. Think about an acoustic guitar--if you're mic'ing it up and you want a lot of the warmth out of it and not a lot of the room ambience yet still having a very dynamic acoustic, you might have to make some compromises with the mic choice and placement. Of course you could use an Omni or perhaps mic it up different ways for different parts of the song, but you also could roll off some of the air conditioner/room rumble/etc. below 70hz or so (that you don't really even need in the rock mix anyway with the Acoustic) and then tighten up the lows with the EQ, take out what you don't need (even with a bandpass at 350hz, dipped a bit, who knows!) and then go to your comp, it's going to be looking at the STRUMS, which is what you're wanting. You don't want it to be sensitive to the flub...you want it to compress the right thing.
EQ to tape / to disc can really save you a lot of time later. It also makes things more exciting during the tracking process and also can keep the band digging the song. It's also just good as an engineer to train your ear to use EQ on the fly and know what "bad parts" of the sound to CUT rather than what "good parts" you want to boost. Think about it!
Tuesday, April 19, 2011
CLA Interview
Pretty interesting video. The interviewer is sort of aggravating, but CLA is of course a genius.
http://www.recordproduction.com/chris-lord-alge-video640.html
http://www.recordproduction.com/chris-lord-alge-video640.html
Subscribe to:
Comments (Atom)