Wednesday, November 25, 2015

Behringer X-Touch Compact Review

BEHRINGER X-TOUCH COMPACT REVIEW


As always, check out the podcast "Recording Lounge" on iTunes and check out our all-new Youtube channel, www.youtube.com/recordinglounge

============================


Hey 
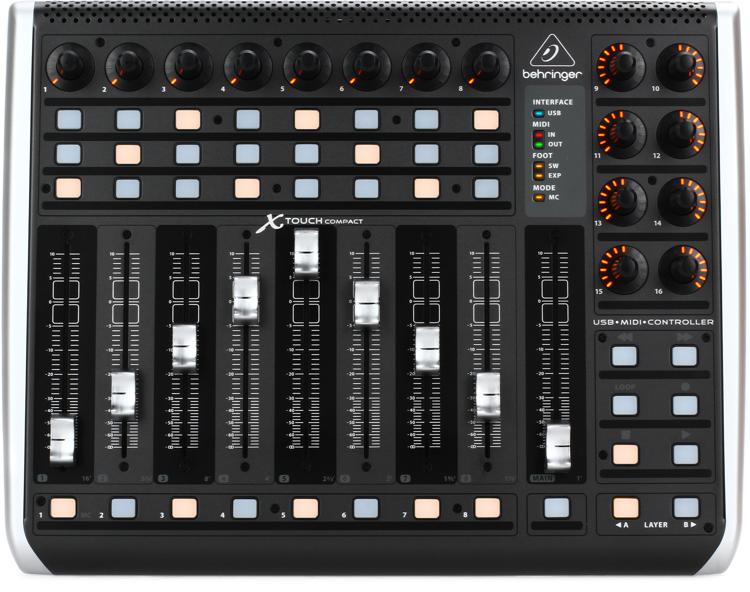
friends, today I'm reviewing the new (ish) Behringer XTouch Compact USB Control Surface. I have been a long-time CC121 User, which is a very simple and straightforward single-fader control surface from Steinberg. Since I'm a Nuendo user, it has done right by my side, but I needed an upgrade. To my surprise, the X Touch Compact released...finally...and was a very fair price - a mere $399 for a 9-fader, 16-pot, 39 button interface. So let's get down to business.


FIRST IMPRESSIONS

First impressions on this unit were very good. The build quality is quite decent, it feels sturdy and not like it's a cheap piece of plastic. Nice rubber feet on the bottom and metal vents in the back. Faders feel pretty solid and the pots aren't too shabby. Nice! The unit is a little bigger than I thought it would be - I'd say it's about maybe 15x11" and maybe 3"-ish tall in the rear...I don't know what I was expecting, I guess I just thought it would be smaller/shorter for some reason - no matter, it is by no means "big." 

INSTALL / SETUP

What install? You literally just plug it in and it works fine...with the Mackie Control Protocol. If you're into the Mackie protocol/MIDI mapping, then it should literally work right out of the box. Just enable it in your DAW and make sure it can support Mackie Control and that's pretty much it. I, on the other hand, despise the Mackie protocol - it doesn't make sense to my brain, so I have to use the Standard Mode and create my own "generic midi remote" in Nuendo and map every button, knob, fader, etc., myself. Which is going to be a very time consuming task, however
it will be customized to how I want it. 

IN USE

The fader action is smooth and it feels natural, as do the V Pots. It's a bit of a shame that all the buttons are the same color - yellow - and they are unlabeled. There is a nice space on the unit for some labeling tape (I use 1/4" patchbay tape to label mine, or 3/8" labels for a label maker). On the next step up (the "X Touch") there are multi-colored lights, which would be a nice feature, but hey, it's more expensive. 

Unit seems to be pretty response and sensitive, it reacts basically as I expect it to. It's not quite as smooth as a Euphonix or Avid interface, but it's pretty darn smooth. It doesn't feel jerky or glitchy when playing back automation, and I have't noticed any major issues. Every now and then I feel like it will get confused on which fader is selected, but that very well could be just a miscommunication with the DAW - like I had a fader selected in the DAW but my hand was touching a different fader and it got confused. Who knows. I haven't been able to repeat it, but I don't think it was an issue with the X Touch. 

It's a very simple, effective device. In short, it just works! 

COOL STUFF

It's literally one of the only devices of its kind in that price range. $400 for this many faders, knobs and buttons? That's crazy.  Good on you, Behringer for coming out with something we've been wanting for a long time. I'm impressed. 

Every V Pot is also a switch, so you can route it to be a pan pot, but when you click it, it can do something else, like mute the channel, or disable the panner, or record enable. If you're mapping it yourself, you can do whatever you want. 

Every fader is touch sensitive - which is a really nice feature. You can do separate CC commands for the touch, which means for example touching the fader will put the channel into write mode, and when it's touched again, it will go out of write mode. So you could automate without having to enable "write" and instead just immediately grab a fader and you're writing automation. Neat! 

There are 8 buttons below the primary 8 faders, which I assume most people would make a "select" function, however, you could easily put the select button above the fader and make these 8 "function" keys for whatever you want - changing workspaces, changing fader banks, edit modes, or opening various windows/devices in your DAW. The X Touch (full size) has Function keys and a few other nifty features.

The unit has a powered USB hub in the back with two ports - you could use this for your mouse and keyboard, or a MIDI keyboard, or anything that works just fine with USB 2 power. You can also use it to chain multiple X-Touch units together! I wish it was USB3, after all it's almost 2016 now and USB2 is on its way out, but hey, it's still a very nice touch...like X touch....get it? ahem....sorry

You can download the Behringer Editor app and any firmware updates from their website and remap your controller to almost anything you can imagine, and save various settings as .bin files on your computer. NOTE: I have read that they've already released a firmware update for the X-TOUCH (full size version) but not the X Touch Compact (yet). 

There is a footswitch input, expression pedal input, and MIDI in/out on the back of the unit. I haven't really had a need for these yet, but it's a very nice feature that could come in handy. For example, you could plug in a footswitch and set it to be "record" so you can sit in your chair with your instrument, ready to go, and not have to hit record and run over to it. You could also run a long TS (instrument cable) line into another room and set it by a drumkit, a guitar amp rig, or by your vocal booth and hit record from a footswitch in there. If you think outside the box a little, there are some really cool options for this. 

LAME STUFF

The faders make a little bit of noise as they move. It's sort of like one of those old printers from the 90s (you know, with the holes on the sides of the paper) except quiet. It's there, though. Kinda like this little buzz...but it's not too bad. 

The manual / documentation is virtually useless. It's really just a "quickstart guide" to help you install it. But remember what I said before - there's literally nothing to it, you just plug it in. In the back of the manual it shows the default MIDI mapping, which is nice, but there's no help regarding re-assigning your own CCs, or using the Editor program, or integrating it with Generic Remote editors. I think it assumes you're just going to use the Mackie Protocol. Lame!

The unit seems to get a little warm - not hot - but warm. It is ventilated well, but I hope it's not the Achilles heel of the unit; I really hope they don't start failing after 6 months of use or something. 

The unit uses a full size IEC cable in the back, which is kinda difficult to position on your desk, and it's kinda bulky. In my situation, the cable sticks out a little too far, and isn't sitting nicely near my widescreen monitor...but I think I can make it work. This is one of the few situations where I actually wish there was a wall-wart instead of a full IEC. 

You can't edit the CCs of the unit while In-program. It's understandable, but it makes it a real pain experimenting with routing CCs. You have to close out of your DAW, reroute, dump the info to the hardware, reopen, test, etc. Keep in mind, this is only an issue if you're making your own CC mapping, not using the Mackie Protocol aka "MC Mode" aka "Mackie Control Mode" 

SUMMARY

Overall, I must admit, I'm really impressed with this unit. I like things that are simple, effective, and affordable. It solves a problem, and does so for the guy that doesn't really want or need to spend $4k on a control surface. 

Is it as versatile, stylish, and high quality as an Avid S3? No, but it's also $400, and for that price, it's got my vote as a really cool control surface, which will allow you to get out of clicking/mousing around and start grabbing faders and automating more often. When I got my CC121 years ago, I suddenly realized much more I enjoyed automating and how much more often I did it! With this, I feel confident I'll automate even more. It's a really fun piece to work with and definitely a step UP from the CC121, even though it's cheaper than the CC121. This is my honest opinion, coming from me, a huge Steinberg fanboy. 

I never really thought I'd say this, but WAY TO GO BEHRINGER! 


Friday, August 7, 2015

Compression Tutorial

Hey everyone! The latest episode of the Recording Lounge Podcast has posted, Episode 78. In this episode we explore all the ins and outs of COMPRESSION. Things we discuss:

1. The attack and release controls
2. The threshold and ratio controls
3. Wet/Dry mix (parallel compression)
4. Sidechain highpass
5. Using the compressor to get more attack or punch
6. Using the compressor to get attack evenness
7. Using compression to get distortion/color
8. Using the compressor to get "glue" or "fullness"
9. Drum bus compression
10. Groove and compression

And much more! This is a 100% free podcast episode packed with 1 hour and 38 minutes of awesome information to help you better understand compression.

Check it out!

https://itunes.apple.com/us/podcast/recording-lounge/id342091435?mt=2

Thursday, July 23, 2015

"BIG TO SMALL" Mixing

"Big To Small" mixing is a technique that I talk about in my book, Three Dimensional Mixing, and it's also something I utilize every single day. I don't give advice that I wouldn't give to myself, in fact, I think big to small mixing is a great technique for anyone to try.

So What is it?

Below is a segment taken from the SECOND EDITION of my book, where I talk about Big to Small mixing. This is the first section from the new book shared anywhere on the net!

BIG TO SMALL MIXING: IN A NUTSHELL

This technique centers around the idea that mixes are NOT a creation of random sounds. They are songs. They are instruments playing a song. It doesn't matter how many mics you used to create that sound, all that matters is that it's an instrument. I see way too many mixers diving into a mix with guns blazing, filtering this and that, compressing this and that, soloing up channels, doing all kinds of ridiculous small picture stuff. We don't want that. We want BIG PICTURE. We want the song to sound like a song.


Pros of Mixing Big to Small:
1) Your mixes come together quicker.
2) You use less CPU.
3) You use fewer plugins and processors in general.
4) You retain context of the song constantly.
5) You are organized and can make easy changes to your mixes.
6) You will likely have tighter phase relationships due to fewer individual channel processors
7) You will likely worry about the right things and ignore the irrelevant things. 

Here are your guidelines:

1) Work quickly, and try to mix at a normal to quiet level.

2) Act on instinct. Act musically. React to your feelings. Don't read numbers or meters.

3) Avoid the solo button (for now).

4) Be organized. Name your tracks appropriately, color code, organize, group, etc!

5) Group things into as many groups as you need. Guitar group, Drum group, percussion group, BGVs, etc. If there are 3 mics on a bass cab, group them into a bus. If there's a "dry" and "compressed" chain on a vocal, bus them. If there's a kick "in" and "out," bus them.

6) Commit to working chronologically. Try not to jump around too much while mixing. Mix in passes. Start at the beginning and go to the end, tweaking as you go, without stopping, without soloing, without changing your monitoring level. Work on it like it's music, not like it's a photoshop project.

7) This technique is best suited for sessions that are clear. Meaning, if you were mixing along the way, this technique might not work as well for you. If you want to try it on an existing mix or one that has already been started, save that as a copy, and open the session up and clear it. Take off all the inserts, sends, panning, filters, EQs, trims, compressors, automation, everything. The only exception to this is if the insert is integral to the sound, for example, an amp simulator on a DI guitar track.

8) Make priorities. Who's the most important character in this song? Who is supporting actor? Who needs to be featured and who is simply an extra in the background? Every song has a different story, and so every mix has different priorities. Never lose focus on the most important things. (I'll give you a hint, the most important are probably going to be vocals, the main instrument, bass, and drums).


Now let's get mixing. 


Step 1: Start with a basic balance of the song. We're talking 15 minutes tops, or about 3 listens through. Really it should only take you one or two listens through the song. Work those faders and pans. I like to start with my faders at -10dBFS, which gives me a good amount of room to go up and down. The first things I will push up (as you might expect) are vocal, kick, snare, bass. They usually get bumped a little bit right out of the gate. If you gain staged your session well, they should be sitting pretty happy together.

Step 2: Once you've got a balance that seems to be pretty nice, check out your master bus. How does the song sound overall? Is it going to need to be brighter overall? Is it too fat? There are two options here. If it needs to be brighter, feel free to add that to the mix bus. If it needs to be thinned out, save that for individual channels. In general I don't try to do much bus EQ, just a dB here and there if needed. Keep it light, keep it simple, and use a good EQ. Your entire mix is going through it. Don't use EQ if it doesn't need it. Next move on to compression. Does the mix need a bus compressor? Audition a few if you need to, and try to set it to where the song starts to gel a little bit. Sometimes 1-2dB is enough. Use your ears. What about saturation? Are you into tape emulations and the like? Add it if you feel like the song needs it, not just because you want to! Listen to the song as a song and the mix as a whole. Big picture.

Step 3: Once you've got the master bus situated, take a look at your groups. Drum group, guitar group, bass group, BGV group. etc. Basically everything should have a group. Listen to them as big picture elements. Do the drums need compression as a whole? Do they need some EQ? Do the guitars need some EQ or some widening? Do the keys need some filtering or compression? If so, apply these things to the groups as needed. You can be a little more liberal this time (as opposed to our conservative bus processing). If you want to group things further or use parallel processing, do so now. An example of this might be sending drums and bass to a parallel buss to compress them together as one unit and blending them in with the originals.

Step 4:  Take a moment to pause. Are there any glaring issues that still exist? Anything you can't get over? Hopefully the dry sounds you got to mix were tracked well, but if there are any glaring issues, this is your chance to use your get-out-of-jail-free card here: you may now use the solo button, BUT...it's only to fix issues. Things like using de-essers on a vocal, filtering out unneeded sub information or room rumble or 60 cycle hum, filtering out hiss, severe boominess, pops, etc., removing noise, ringing, humming, etc., noise reduction or gating, etc. This is not a time for shaping things. It's only a check up. If there are any problems with the audio, fix them now. They should have been fixed in the tracking stage, but I digress.

Step 5: Once you've fixed any glaring issues (hopefully there weren't too many), give the song a listen from start to finish again and check your balances and bans. Again, when balancing try to work big to small. Need more drums? Turn up the drum bus. Still need more snare? Turn up the snare.

Step 6: Now that you've got a pretty good balance of the mix, you've worked with the master bus as a whole, the group channels, and fixed any glaring issues, then rebalanced, you're ready to start shaping the tracks. Again, commit to working big to small. Instead of reaching for a bell EQ, try a gentle shelf first. Use wide Qs. I can't tell you how to process your tracks in this stage. This stage is all about getting them to blend well together, and admittedly, it's a hard step, and it will be the longest part of your journey. A lot of novices start here and immediately try to shape the tracks together without getting a frame for the mix as a whole. You have to start with your foundation, build a frame, add the walls, put up the drywall, and THEN paint them. So go ahead, EQ, compress, add effects, do what you need to do. But always try to avoid the solo button, try to mix chronologically, and try to remember that you are mixing a song and not a collection of sounds. 

Step 7: Once you've got a nice blend that you're digging, Automate your mix from good to great. Too many novice engineers avoid automation. It's possibly the most important tool we have for making mixes direct the listener's attention. We can manipulate what they're focusing on at what moment, who is important, who needs to take a backseat. We can jump out at them and grab their attention by automating up a vocal phrase or a drum fill or a guitar riff. We can suck out the low end on something only to bring it back later. We can add effects to a certain part. Truly automation is one of our best friends in the mix and you should use it. If you're not using it, you're probably wrong. Not everything needs to be full spectrum all the time, and not everything needs to be full loudness all the time. You need to give things little moments to be featured - they won't necessarily do it on their own. Not everything can shine the entire song - you need to give everything it's moment to shine so that it creates the illusion that everything is shining. 

I hope this mixing theory helps you make better mixes. I know it may seem crazy to some of you, but this is exactly how I mix. Like I said, I wouldn't just make this up and throw it out there. Mixing big to small helps me mix quickly, effectively, and not lose sight of what's important. It helps me minimize my "tweaking" phase down to half of what it used to be, and it helps me use a lot less processing on my mixes in general. Nobody wants their stuff to sound overmixed, overprocessed, overtweaked to oblivion - it just sounds terrible.

For more mixing tips, helpful hints, and rants about audio, check out my book, Three Dimensional Mixing, and of course, the podcast, Recording Lounge Podcast. 3DM, The Second Edition, will be releasing later this year in digital and print form (finally), and if I may plug myself, I highly recommend it!  ;)