Okay, so I'm going to talk a little bit about layering guitars. It's something I'm very familiar with; I record a lot of rock music with lots of guitar layers. Sometimes the easiest way to get a big wall of guitars is to just play a track on the left, then double it as tightly as possible on the right. Sure, that's the old standby and that almost always works. But what about three layers? Or Four? Or Sixteen (which I have totally done before - not recommended). What about when you don't want the guitar on the left to sound like the guitar on the right?
Sometimes all you need is these two parts. It's often "bigger sounding"
to have two parts and nothing else. My favorite "goto" is to have two
well written parts, one left, one right, and any leads in the center. Various parts in the song may contain other little guitar riffs or whole note chords on the chorus or last note of the song, but nothing drastic--the frame is built around the two main guitars.
So, here are some tips when it comes to layering guitars. The best guitar tones Ive ever gotten as far as "layers" go have come from:
a) carefully selected guitars
b) carefully selected amps/pedals
c) carefully written parts
d) vision
I'll tackle these one at a time.
a) Carefully selected guitars. My favorite guitar layering
sounds come when the tones match. So for example, if you're going for
"big rhythm" a lot of times that means two guitars, left and right,
probably humbucker but sometimes single coil. IF you're going for more
chimey guitars (think 90s rock, Country, Pop) you might be better off
using a single coil, or something like single coil left, P90 on the
right.
The tones you choose don't have to match exactly, it depends on the role
they're playing. Big chorus guitars that create a wall? Probably big
humbucker sounds as aforementioned. If your goal is to make it sound
"doubled," then DOUBLE IT. If the goal is to make it sound more like a
BAND, then you may be better off playing two separate guitars.
I generally try to match the LOW end on the guitars. Like, You generally don't want a really thin guitar on the left and a really thick one on the right. It's generally something like, slightly warmer on the right, slightly edgier on the left. Sure, you can clean up the low end in the mix with filters, but it's generally best to think of this during tracking. So like, two Les Pauls make sense together. A Les Paul and a Tele will be a little harder to match in terms of low end, but there are a few tricks:
-Have the Les Paul Play Higher Up / Tele Play Lower
-Use a "bigger sounding" amp for the tele and a "smaller sounding" amp for the LP.
-Try neck pickup on the Tele and Bridge on the LP.
-Try a ribbon for the tele and a 57 for the LP.
You really just want them to sound like they belong together in the context of the band. Their midranges will differ, which is good, that's what gets you separation. The low end will define its size. So just be cautious when you're matching up guitars.
b) Carefully selected amps/pedals. Though I find that most of the
time guitars sound best going straight to the amp, but sometimes pedals
can provide a special sound that's not achievable by any amp - like a
Tubescreamer does "a thing" that amps don't really do. Pedals often have
a sort of compression in them that can help sometimes depending on the
part. I generally find that MUCH LESS GAIN is needed when adding guitar
layers. I like to think of it this way:
-The more notes being played in each chord, the less grit you can get
away with. Solos can sound great with tons of distortion. Big chimey G/C
chords? No way. Power chords? Decent amount, but not as much as lead
(generally).
-The more layers of guitars you plan to have, the less distortion each
one needs. Distortion adds up and starts to sound like "one fizz" coming
from the speakers. Heavy rock guitars aren't really that distorted -
it's that they need to be played evenly and tightly. It's usually "just
enough gain to sound chunky."
-Distortion is essentially clipping. Part of what we "like" about
distortion is how it controls the level, not just how it sounds.
However, you don't really get "PUNCH" always - it starts to sound well,
clipped. Thus, I find that recording mildly driven guitars and
compressing them to heck sometimes sounds a LOT better than recording
super dirty guitars and not touching them with a compressor. I find that
the compressor helps it have the evenness of a distorted guitar sound
(which makes the player happy) but it doesn't sound like buzz buzz buzz
(which makes you happy).
c) Carefully written parts. I think this is rule #1 (even though
it's letter C...) IF the part conflicts with the vocal's range, it will
always conflict with the vocal. Think about that. If you're playing the
exact same notes that the vocalist is singing, no matter how you EQ it,
those notes will be in there. Then you'll be upset and say "aw man I
hate making my tone sound like crap in the mix - it sounded sooo good
before!" Well, the tone can be perfect, but if the part is wrong, you
can't EQ it out.
Beware of where the VOCAL sits. Generally speaking, power chords are
easy to fit in a mix (provided the tone is right) because that rarely
clashes with a vocal. It's when you start getting into the E-B and G
strings that you really start to conflict. In that case, try to avoid
playing the exact same notes the singer is singing (unless you're
doubling the vocal melody on purpose, which can sound really cool).
Another tip that can help here is doing what...oh...LAYERS. Record the
"big guitars" down on the low three strings with your meaty drive, but
then record cleaner, even lightly driven guitar parts on the higher
strings. On both parts, avoid crossing over to each others territory,
ie., try to stick to the low 3 or 4 strings on the power chords, and try
to stick to the high 3 or 4 strings for the cleaner parts (mostly).
d) Vision. Before you lay down a single guitar, you NEED to have
vision of the picture you're about to create. I always like to make a
"roadmap" so to speak of the guitar arrangement, because it's so easy to
just add and add and add. If you know where you want to end up, you can
carefully select tones. Remember before when I said basically that the
more guitar parts you have, the less big each one needs to be? Well, if
you start by thinking "this song just needs two guitar parts" and then
you even up adding 5, they may NEVER fit together because you didn't
consider all five in the process.
So. Listen to the song, the rough, the demo, whatever, and try to map out what's needed. Here's an example.
Intro - 5 guitar parts, two power chord Les Pauls, fairly gritty. Then,
two chimey Teles with LIGHT grit. LPs Hard left and right, Teles 50/50,
lead guitar, creamy distortion, panned center.
Verse 1 - Les pauls drop out leaving the Teles. Probably need a little
more grit, but not necesarilly low end or body. This less the low end of
the verse drop out a little so it feels smaller but not wimpy. Both
teles playing carefully written parts
Prechorus - lead part comes in in the background, not super full, don't step on vocal.
Chorus - Les Pauls come back in, which creates the illusion of the song
exploding (as the other guitars are just 50/50, these are 100L/100R.)
Etc.
With this type of vision, you can plan out the tones for each section,
each part, and try to envision how it will all come together before you
even put up a single mic. TRUST ME, it will save you a lot of pain and
suffering later down the road. In the digital world, you can fix a LOT
of things. One of the only things you can't hardly fix is over distorted
guitars. When in doubt, less gain can work just fine. When in a LOT of
doubt, always record a DI.
Another side tip - a lot of n00bs will pull the whole "mic up an amp
with two mics and pan one left and one right." As someone said before,
that will do nothing by take up a bunch of useless space. It will NOT
sound big. Come on, just play it again, is it that hard? It sounds SO
much better that way!!! Nevertheless, there are a few times when I will
play with out of phase sounds on purpose. I once did a track that needed
"something" in the verses with the drums, bass, vocal, and main guitar.
But we didn't want an organ or pad, because they wanted a pretty close
representation of their sound live, which is just 3 guitars, bass,
drums. In that verse, the middle guitar was the only one playing, while
the other two sat out. What we ended up doing was using a half-cocked
Wah pedal filtering out all the top end of a guitar, and mic'ing up a
cab with two 414s in a weird stereo placement. I then flipped one side
out of phase and panned them hard left and right. This created the
typical "behind my head" sound that out of phase stuff creates, but with
the part SUPPOSED to be almost more felt than heard, it worked out
beautifully. In the track it sounded so cool because you couldn't really
pinpoint what it was...or where it was coming from. It was VERY low in
the mix.
I hope these thoughts have been helpful to someone out there!
Wednesday, March 27, 2013
Thursday, November 15, 2012
How Many Mics?
There has been a question I get a lot from students and some interns that is simple and yet a very great question: how many mics do you use per source?
It seems like a stupid question whose answer is just "it depends."
But truthfully there are a lot of thoughts that go into the decision of how many mics to use on something. There are some obvious ones and some less obvious. Let's take a look and break it down a bit. Some of these are reasons to mic, others are issues you will encounter.
1. Phase issues. - This seems to be the primary issue with using multiple mics. As you add more mics on a single source, the sound arrives to both mics at different times. The mics also have different characteristics that can lead to more phase issues between the two. Put up two mics on something and invariably you WILL have some sort of phasing, it's just a matter of how well it works for you. Sometimes the EQ differences you get from two different mics can be amazing when combined. Sometimes it's terrible.
2. Stereo width. - This is an obvious one. We use multiple mics to capture a stereo picture.
3. Ambience. - We may use a close mic and a room mic to get a direct signal and one less direct. This can be nice on just about any instrument and usually has a fairly nice phase coherency if you place the mics far enough apart. You can use the early reflections to your advantage.
4. Dual processing. - You may use two of the same mic but process them differently. One may go through THIS preamp with THAT EQ and with THAT compressor, etc.
5. Mix Options. - Also a very popular reason to use multiple mics. You may record a guitar cab or drumset with multiple mics, but only use a few come mix time. This is a fine reason, but sometimes can lead you into the habit of "safe mic'ing."
6. Safe Mic'ing. So what is this? This is a very common pitfall with lots of engineers out there. It is basically using a ton of mics to capture "all the parts of the sound" without actually taking the time to make each mic sound good. That type of engineering is a gamble - you put up 4 mics and hope one sounds good. That's bad news in my book. What you usually get is one that sounds okay and three that sound mediocre and are unusable with the first. There are phase problems, tonal incoherency, and the like.
7. Bright Mic, Dark Mic. - This is very common on lots of sources. A good example would be like an inside mic and an outside mic on a kick drum. One is for the bright attack of the beater, and the other is for the low thump. You also see it on guitar cabs - a 57 and a Ribbon combined can get a really great sound. The 57 is present and bright while the ribbon is dark and has a big low end. They compliment each other nicely.
8. Hifi Mic, Lofi Mic. - Also very common for vocals and drums. You'll have a condenser mic on a vocal to get the nice "pretty" vocal sound, but then another mic may be like a 57 or something running through an amp to get distortion. There are lots of applications of this. Guitar amps could even have like a 57 for a classic lofi sound and then a condenser for a hifi sound.
So with all of these considerations, how do you even start to pick? Here are some tips.
1. Figure out how big the source is in the song. If the source is an acoustic guitar and it's a solo instrument track, you will probably want a fairly large sounding acoustic guitar to take up a lot of space. If it's a vocal and an acoustic, it may need to be a bit smaller. If it's an acoustic with a band, it will need to be a lot smaller. The more tracks you have, the less space each can occupy. I'm talking stereo width wise AND frequency wise. Things will a big full low end may not fit in a dense track. You'd be better off recording it with a less bassy mic than trying to EQ it later. Or moving the mic backward to give it some more depth and also less low end.
2. Figure out what tonal role the source plays in the song. If the source plays by itself a lot, it may need to be bigger sounding. If it's in the track barely audible it doesn't need a super full frequency range.
3. Figure out how upfront the source needs to be, or it's spatial role. If something needs to be right upfront and in your face, mic it that way. Close. Under a foot usually. If something needs to sound farther away, mic it farther away. You should realize that not everything can be upfront and not everything can be far away. If everything is upfront, your mix will resemble a straight line of performers on stage with no front to rear depth.
4. Start with one mic. Always. On every Try to get the sound as good as possible with one mic and as close to the sound that you want with just one mic. This helps keep phase issues to a minimum and helps you focus. Then if you need to add more to a sound that you can't get by just one mic, then add another mic. Take a drumkit for example. You may start with one overhead. If you want more width, make it a stereo pair for overheads. If you need more kick (which you probably will), then maybe add an outside kick mic. Need more click? Add an inside kick mic. Need more snare? Add a snare mic on top. Need more floor tom? Need more room ambience? Add one by one. You get the picture. You may find that a drumkit sounds good and better with 4 or 5 mics than it would with 15 mics. It surely will sound more phase coherent, which will make it sound more solid and more well recorded.
5. Try listening for exactly what part of the tone you're missing. If you are recording an acoustic guitar with one mic and you feel like you need more midrange, try adding a dynamic mic someplace. Just because you add another mic doesn't mean you have to pan it. You can pan it straight underneath the other mic. To take the previous drumkit example, You likely will need more kick in your overheads just because OH mics generally don't contain a lot of kick. But, do you need more CLICK sound or more LOW END? It's likely low end. If you're recording electric guitar, try working with a handful of mics before you find the right one. If it's picking up everything really well but you just need a little more bottom end, consider adding another mic. Maybe just barely bring it up underneath.
6. Try Mid Side Mic'ing. Google it and learn about it. It's a phase coherent way to add depth and width to tracks like acoustic guitar and drums and room mics. It's a brilliant technique that works well in any genre.
7. The fewer mics you use, be less afraid of EQ. Obviously it would be best to get the sound right from the start, but if phase starts getting in the way, it'd probably best just to use a single mic with loads of EQ. It will sound much better to EQ a singular mic on a source rather than get phase between two mics. So, if you're doing drums with multiple mics, really try to get it as close as possible with the mics. Try not to EQ like crazy. The only thing you can really get away with EQ'ing crazy are the close mics, because they're so close. On a guitar, it may be best to use one mic and EQ it. Same with a vocal. It really does depend. When in doubt, use the BEST eq you can. That probably means analog EQ. Sorry plugins, I still have yet to find any plugin that really sounds quite like the hardware. My favorite plugin for EQ is DMG EQuality. That can really make me happy.
8. Sometimes I'll record an acoustic guitar with something like 4 mics. I know that sounds absolutely ridiculous, but I'll explain. I'll probably start with a mono SDC maybe 15" away at the neck joint. I like about that far away on acoustic guitar. I'll get that to sound as good as possible. If I need some more size and width, I'll throw up a figure 8 mic underneath for a Mid-Side setup. Then I may put up a room mic 6-10' back to get some ambience that I may or may not use. If I need a bit more midrange (sometimes acoustics can sound brittle and boomy, but not a lot of woodiness, which I really like on acoustic), I may add a mic down by the bridge, which has a characteristically midrangey tone. I may use a dynamic. I may use a condenser. How many of these mics will I use? Likely just one or two, but I may use different mics at different sections rather than having to EQ. For example, if the song starts with acoustic but then the band kicks in later, I will probably start with the SDC with the fig8 mic to get a big full sound. As the band comes in I may just use the mid mic. When the electric guitars kick in, I may just use the room mic to push the acoustic backward. And, if need be, I can try the midrangey mic to help it cut if it needs to. That's just an example.
I hope this has given you some things to think about! I've done some sessions with 15 mics on drums and others with 3 and been happy with both. Ive done some with ridiculous mic'ing setups for acoustic guitar for the purpose of picking a few in the mix later. Sometimes just one mic works. The more you engineer you will find good starting places of your own. Don't follow the books. Don't! Find your own starting places and build from there.
Inspired by my weird three mic vocal setup today:
Neumann KM184 > API Pre > Distressor
RE20 > Vintech X73 > Distressor > Tube Tech CL1B
SM57 (with a glass slide taped on to it) > Yamaha Mixer > Musket Fuzz Pedal > Reason Amp > 112 Cabinet > Fathead > Vintech X73 > Distressor > Dbx160.

Friday, September 14, 2012
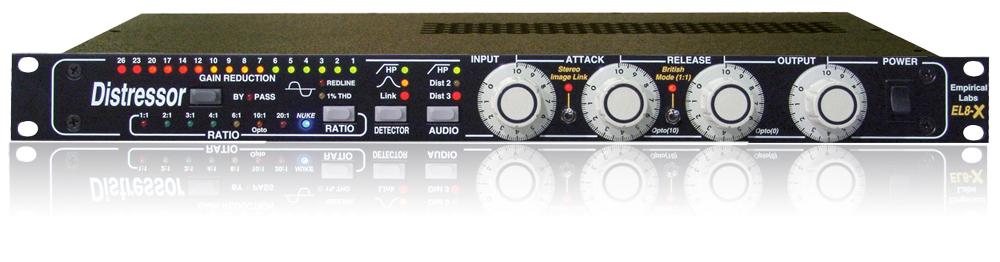
Empirical Labs Distressor Review
Alright so here I am reviewing the wonderful Empirical Labs Distressor.
If you're wondering about my credibility, you can rest easy - I have two of them and use them daily, and have for years. Just finally getting around to writing a review for this blog. They are very versatile units that have lots of different capabilities. If you look through the manual you can learn plenty of what this baby can do and how. I'll talk a little bit about what it does and why I love it and why you should get one.
The General Idea
I think the Distressor is the BEST compressor under $1500 that money can buy. If you were to just buy one compressor for all of your tracking duties, I believe the Distressor would be it. It can be mellow, it can be ridiculously over the top. You can lightly tap a signal or crush it to all oblivion. You can emulate tape saturation, emulate tube optical compressors, emulate an 1176, or do super clean high fidelity transparent limiting. Really a surprising piece of gear. I wish I had five more.
The Sound
The Distressor is a very hi-fi piece of equipment, boasting a frequency response of something like 20hz-300khz accuracy with all of the "Distortion" modes turned off. It can sound quite transparent, which is something a lot of people are worried about before buying - they think "eh, it may be too aggressive for me." The 2:1 ratio has something like a 30dB knee! Very wide! Very mellow. The attack and release times are quite variable, so you have lots of options for super mellow compression. However, if you want to get a little bit dirty, Distortion mode 2 emulates second order harmonics, which is generally associated with tube like saturation. Distortion mode 3 emulates second and third order harmonics, which can closely emulate the sound of magnetic tape saturation. Keep in mind these Dist modes are emulating saturation, not any specific pieces of gear.
The Distressor, however, CAN be used to emulate certain pieces of gear like the LA2A, 1176, etc. The different attack, release, and knee curves of the various ratios provide different compression sounds, and the different attack and release times can provide that classic sound. The Dist modes may be used in conjunction to further accentuate the warmth of the source. I find that while tracking, it's an absolute go-to. I like it on 4:1 or 6:1, fast attack and fast release, Dist modes off, just tapping 1 - 3dB on kicks, snares, etc. This helps prevent any clipping, and also keeps the source a little more consistent in level. You know how drummers always play quieter while checking the mics...
Set with a low ratio, fast attack and fast release, with Dist 3 mode on, the sound somewhat resembles analog take saturation, which can nicely warm up guitars and give them some edge. I know "giving them edge" and "warming them up" may sound contradictory, but that's really what it does...it's like turning up the sharpen control on a photo - looks better, more defined, but quickly can look bad if overused.
The Distressor can in general is a very pleasing soft knee compressor that is quite transparent at lower ratios. Once you get into 10:1 and higher, it becomes more obvious compression. For tracking or mixing, you'll be amazed what it can do to a vocal, a bass, kick, or snare, or a drum bus. Throw it on "Nuke" and destroy your drum room mics - it really sounds quite special on that setting.
WHY YOU NEED ONE
Okay, so the truth is, you don't really "need" any single piece of gear, but I will say, this is a GREAT compressor for you. It's very intuitive to work with and really helps you understand compression. You turn the knobs, you watch the lights, and you hear the difference. You can really learn a lot from using this device, and if you already know quite a bit, you'll surely have a good time exploring all that you can do. I use it while tracking, I use it while mixing, Ive even used it live! Bass, vocals, drums, guitars, percussion, it REALLY does it all, and not in the way that it "does 20 things okay as opposed to one thing great." It really sounds good most of the time. May not be the best, but it always works. I love pieces of gear that always work.
SUMMARY
What can be said about the Distressor? It's a modern classic with good reason. It rocks. I've NEVER said to myself "man that sucks." The Distressor seems to find its way onto every project that I record, whether that's jazz, rock, metal, or funk. It's got a lot of attitude, a LOT of settings, and it's a lot of fun to work with. Very easy to learn, lots of great info in the startup manual they include, and tons of great info about it online.
Monday, September 3, 2012
Low and Low Mid Buildup in Mixing
One trend we all seem to notice in mixes is that to get things to sound
the way we hear them in our minds, we often end up adding top end, and
or taking out low end, carving spots in the low mids, finding things to
accentuate in the high mids, getting instruments focused to their
midrange, etc particularly in dense mixes. Not necessarily a "lot," but
regardless it seems we always have to do it. Very rarely can you just
put up a session flat and have it sound almost finished.
So WHY do things cloud up in the low end? I mean obviously a bit part of it starts with arrangement, how things are played, instrument and amp choices, particular settings on these, etc. Is it related to the fact that while recording we often make everything sound big and full? You know "hit the kick drum" and we get levels and say "yeah, sounds like a kick," but in the mix it's not bright enough, and so on?
Is it that a lot of "homebrew" recording engineers are using gear that is often muddy and unclear in the mids and highs? I remember the first time I heard an A/B between a rack of real 1272s and a rack of newer API 512s. The vintage 1272s were SO much brighter and clearer than the APIs. Not that this is a bad thing whatsoever, just a different flavor.
Is it that many inexperienced engineers are recording in quite muddy sounding rooms in the first place? Even in mixes I get that are done by talented engineers, I still have to carve space.
Is it that electronics and recording technology in general can't process sound the same way that our ears do? Our ears seem to have the amazing ability to "make stuff sound better" when we can see it, experience it, etc. McGurk Effect, Coctail Party effect, any other scientific explanations will tell you that we are highly influenced by our eyes, when, if we were actually close our eyes while listening to a band at a concert (and I never do this!), it may not sound that great in comparison to the record or whatever.
The only real justifications for tracking things with big full low ends that I can find are:
1. Isolation. Micing things close with cardioid mics unfortunately gives us proximity effect
2. Getting what the client wants out of their sound - they hear it through the monitors and want it to sound huge. Make them happy, then it sucks in the mix.
3. Being able to bring certain instruments more full range at some sections than at others (for example, acoustic guitar intro, full band starting at the chorus - acoustic can easily be filtered for the rest of the song).
Other than those three though, it absolutely drives me up the walls. I feel like on the next project that I record , I'm going to double mic every close mic'ed source with a far mic. Let them hear the close mic so they can say : "dood yeah that is my TONE so fat and analog and huge and warm...but also super clean and digital and detailed and crisp" but then...secretly...my other mic is actually picking up the real sound.
I am quite convinced that since the beginning, every instrument is designed to function as a full range solo instrument. This is why a mix of acoustic guitar and vocal needs much less mixing work provided that the stuff is recorded well. When you get a typical rock track it's like trying to fit twenty solo instruments on sixty tracks down to a left and right. No wonder people have such a hard time learning to mix... It's totally counter intuitive to the way we listen to our instruments in real space. Live situations often have FAR more low end than recorded material. And it's totally valid for that application.
This brings up another interesting thought...
If you track something with low end and then roll it off, you may be reaping some of the benefits of the harmonic content naturally associated with a "big sounding" source. We can potentially all agree that in general a fender Bass through an ampeg sounds pretty great. Sounds great in the room, everyone's happy, so theoretically the mic choice and placement (eg. Brighter mic than we may usually use on a bass cab) might more effectively capture the source rather than recording with a big sounding mic and then rolling it off...
I'm no acoustician but I assume the result would be much different if you recorded a thin sounding bass through a thin sounding cab with a mic like a fet 47. The harmonics created in the mids may not be there since we've neutered our bottom end. It would probably actually sound worse. Plus the client would be completely in the dark in terms of getting "their tone." I'm a musician too like many of you, so I totally would hate a recording engineer making me completely falsify "MY SOUND" in the live room. In the mix, it obviously has to fit, but I'd be put off (even knowing what i know) if he was like "hey screw your 2x12 let's use this 1x6 cab to fit in the mix"
Plus, tiny sound is interpreted as tiny in a room mic, even if the close mic fits in the mix... Room mic would sound terrible.
Mic placement vs mic choice vs tweaking the source...
I guess it's my assumption that the source should be tweaked until it sounds good in the room, not neutered so to fit in the track as I previously joked... I think in practice having a big sounding source in the room is not always a bad thing... Makes the client happy and is of course the sound they are used to hearing in their own spaces. Now to capture it.
This is where the real art or engineering comes into play I guess. The right mic and placement is much more important than EQ obviously but the low end is a great example of why. It's proof. It's probably the same reason why we often start with overheads or rooms and just fill in... The overheads rarely have an overpowering low end which helps us out in the long run.
As far as mixing goes, checking on reference monitors and checking reference mixes when level matched is a GREAT way to see if you're in the ballpark. Low end and low mids WILL make or break your mix. Period.
A sidebar about low end -
I generally find that there's not much going on below 100hz that is anything but kick and bass. Maybe a little floor tom ,but that's it. Reverbs have HPFs, vocals and guitars and pianos have HPFs, everything gets a highpass. Most things can stand a filter pretty high - some things up to 300 or 400hz! I generally find myself putting a HPF on kick and bass at 30-50hz, depending. Usually just to get rid of sub clutter. Guitars are generally around 100, vocals are generally 120, keys really vary depending on the role they play in the track. Pads can sometimes stand a filter up to 300 if they're supposed to be airy. Backing vocals usually get up to 150 or so, again, depending on their role.
Remember that mic distance also will affect the low end of a source, as well as mic polar pattern. Using a mic just 1" away from an amp sounds a lot different than 5" away from the amp. Proximity effect can really add up in the mix and can start to sound bad.
THE most common recording mistake I hear in tracks I get from novice engineers is low end mud. Everything is muddy. Too much lows and low mids on everything. I attribute that to the things above - proximity effect (placing cardioid mics too close to the source), sub-par acoustic environments (causing buildup of muddy frequencies), and cheap gear that is unclear in the midrange and top end.
Think about it!
Thursday, July 12, 2012
Review of Slate VCC Virtual Console Collection

Hey friends - so I decided to pick this plugin up this week to see what it could do. In the grand scheme of things Slate has a great reputation in the audio world, but I must admit I was skeptical when this $250 plugin claimed to help get the sound of $250,000 consoles. The idea is based around the unique saturation and summing features of various consoles like the Neve 8048, SSL E (with G upgrades), a Trident 80B, an API, and on the new version, a Tube Console, my guess is a Universal Audio.
I'll start with my conclusion and work backward. I LOVE the plugin! It sounds great, it makes my mixes better. Period. I think it's a great buy, and if you're on the fence, just get it and you won't regret it. As of now I'm in the same boat as many other customers, saying things like "I want to go back and put it on all of my old mixes..."
Alright. Quick back story. Initially my main reason for getting this plugin was because I love to make use of all kinds of saturation in my mixes. It doesn't matter if it's rock, folk, pop, hip hop, or jazz, I use tape, tube, and transformer type saturation plugs all over my mixes. I am constantly trying to get my DAW to sound closer and closer to a desk all the time. This type of plugin had me hooked when it talked about summing and crosstalk, the two elements I felt I was missing from the DAW. Now sure I've heard about some hype in the summing world, but I've honestly HEARD analog summing and to ME it sounds better. Is it night and day? IMHO No. Is it better in the end? Yes. I feel like if you spend $250 to make every mix you do 5% better, it's worth it. With that in mind the idea of spending $250,000 to make my mixes better sounds sort of ridiculous on my budget...
Anyway. Let's talk about the plug.
You've got your console STRIP and your BUS. The BUS I believe is designed to be for the stereo bus, but I've been using it on individual busses as well. On almost every mix I do I have six busses: lead vocals, rhythm guitars, lead guitars, drums, bass, keys/synths. Almost everything in the mix will go to one of these busses. I don't usually even have any plugins on these busses, I just do it for ease of turning down entire instrument sections, but now I've been putting the mix bus plugin on all of these.
So how does it SOUND? In my opinion it sounds great. It's noticeable on nice monitors, and VERY noticeable on headphones and in the car (probably because on bother of these systems the speakers face inward). Not super noticeable on crappy speakers, but that's expected. To me it sounds like your ears get pushed back a bit when the plugin comes on - like the stereo image widens and it goes from sounding like the sides of the mix are less in front of you and more on the SIDES of your head. It's VERY cool sounding, and like I said, it's subtle enough where it won't ruin your mix, and though you will have to mess with things if you're doing it on a mix that's already been done, you'll absolutely miss it if you bypass it.
The trend in practice is that the guitars seem to "lift" out of the mix a bit, the kick and snare are clearer, the bass is tighter, and the vocals seem a bit more upfront. That all to me sounds like a fancy way of saying it gives the mix more width and depth, and a bit more attitude.
So WHY does it sound better? There are two main reasons. First, each of the consoles has a slight EQ curve that varies as you drive into it. The more you drive it, the more top end or low end you get, etc. Things vary a bit in that regard. Second, as you add distortion, your peaks are smoothed out a bit, meaning the RMS level (the average level) of the music is brought up a bit BUT without the use of a a limiter. This brings out the details of the elements. Saturation and distortion also tighten up low end, so that allows a more unified center image and a stronger punch to the music. Elements on the sides are often elements that can stand to be driven a bit more, thus they get a bit brighter and tighter, so they sound wider as well. The mixer crosstalk is the same thing - changes up the left right balance a bit and (according to some) can even alter the phase a little, causing the mix to seemingly have more depth front to back. SATURATION is your friend!
Granted, ALL of this is my opinion, and I'll be the one that admits it is somewhat subtle! It's not going to SAVE a bad mix. Most people are searching for a magic mix plugin that makes their mixes "sound analog" when in reality, they just don't know a thing about analog desks, tape, tubes, how they work, what they sound like, why they make sounds better or worse, and how to use the DAW properly. These same people rarely understand the differences in DAW processing, clocking, summing, etc. Many of these people also just haven't developed their ears in such a way that they understand HOW to get a mix to sound good. This plugin will NOT save poor mixing skills! If your mixes are getting good and you feel like "man they are SO CLOSE to sounding how I want them," then this plugin might help inch you closer to the door.
The COOLEST feature of the plugin has got to be the grouping function. You can group every single track together in 1 group (up to 8) and have them all controllable from a single instance (and ANY instance for that matter) of the plugin. This is primarily useful for switching the console type, testing bypassed/in, and adjusting the drive on all the channels at once. Very cool, definitely useful.
I say leave it grouped all the time. Then, Put the plugin on every channel as the first insert. In Nuendo this is easy because on each channel there is a TRIM control, so I can find the sweetspot for drive on each channel (e.g., I may drive the snare and kick more but the guitars less) and also can compensate for the fact that I may have recorded the two rhythm guitars at slightly different levels but I want them to drive the same amount. In PT or other daws without a trim control, I suggest putting the plugin SECOND in the chain, and first putting a trim plugin or an EQ or something where you can adjust the input.
Contrary to popular opinion it's not that heavy on the CPU. On my entire mix right now (I have it on 40 tracks, 6 busses, Master bus) it adds about 20% CPU when engaged. Without the plugin my CPU is hitting about 40% and with it's 60%. But...my mix is done. So 60% CPU for a finished mix that sounds great? That's no problem to me at all. Runs great. I'm using a Quad core i7 processor, so those of you with 8-core Macs will have NO problem. Dual core MAY be a problem, so I suggest putting the channel strips on things like kick, snare, toms, bass, lead vocal, and main guitars, and then the master.
It is fairly taxing when you do oversampling, which yes, sounds better. How much better? I don't know. I just hear it a little more obviously when the oversampling is on. I suggest turning the oversampling to high for offline render, and as high as you can go for online (real time). On more dense projects this may not be an option, but on smaller projects try to put the oversampling high.
So like I said - if you're on the fence, get it. It's sure as heck a lot cheaper than going out and paying for an external summing box with all the breakout cables and whatnot, and to my ear it does the same thing that those boxes do.
Saturday, April 28, 2012
Take Out the Bad Stuff
On Episode 31 of the Recording Lounge, we talked a lot about EQ and how to use it to our best advantage. The big moral of the story that I said about ten times was "take out what's bad, don't add more of what's good." This is SO SO TRUE and I practice this every day of my job. The more you add EQ, the worse things tend to sound. By worse I mean unnatural, digital, and all other sorts of things. Our ears are much less sensitive to cuts than they are to boosts, so that causes us to naturally boost more than we need to, while a cut of maybe half that would do the trick.
Some of my favorite plugins for the "corrective EQ" plugin that I put as the first plugin in the chain are:
Oxford EQ - Sonnox
Neve 1084 EQ - URS
Channel Strip Pro - URS
Linear Phase EQ - Waves
Q10 - Waves
None of these are super fancy plugins by any means. They are very basic, very clean sounding EQs that do what I need them to. I like the sound out of all of them and they are all within purchase of most of you, especially the Waves Q10, which comes with some of the cheapest Waves bundles, and it's amazing! Very clean, you can get very surgical with it and take out tiny single frequency resonances (like snare drum ring) or you can get very wide and make subtle shelves. I prefer the Oxford a little bit on some things, but in general the Q10 never fails as a corrective EQ. If I have to EQ something a LOT, for example something that was really recorded poorly and was sent to me, I will use the Linear Phase EQ from Waves. This is an ultra clean EQ that adds no phase shift during the EQ process. All other EQs add a little bit of phase shift to each band you add, actually making it sound a little less like the natural sound. Some argue that this is essential to some sounds and absolutely detrimental to others. In general, you want to EQ as little as possible; things just always sound better without it.
After my initial EQ to remove any "problems" or unneeded information, I'd reach for a compressor before I'd reach for another EQ. My favorite compressors in the box are:
C1 / Audiotracks - Waves
Punch - MSI (cheap plugin!)
1176 - Waves
LA3 - Waves
API 2500 - Waves
L1 - Waves
CL1B - Softube
If I have those plugins I can pretty much complete an entire mix. I'm not a huge fan of a lot of the Waves compressors, but in so many cases, the most basic C1 comp that comes with the cheaper Waves bundles will beat out some of the nicest plugins I've purchased. We did an A/B test with the C1 and my Distressor (hardware piece from Empirical Labs) and we matched them to where neither of us could tell which was which on acoustic, vocal, and snare. It was amazing!
In the end, if you can make each track just 5% better, you can really improve the quality of a 50 track mix. Every little bit counts. Mixing is not a singular skill - it is a collection of hundreds of tiny little decisions that all work together symphonically. Trust your ears and never stop learning!
Monday, March 12, 2012
Volume Pedals and Guitarists
My little spiel about volume pedals -
In my opinion, the best overdriven guitar tones possible come from running a guitar straight into a good tube amp. Many of us can agree with this. One thing that really bothers me - and it happens more than I ever realized - I don't understand why players looking for this "holy grail amp" tone out of their pedals put a volume pedal after their drives.
I don't mean to burst anyone's bubble, but it doesn't sound right. I don't want to offend anyone here, I just want you to TRY this out. Give it a spin, give it some real thought. I know it's really hard to take the volume pedal off the board because of all the freaking velcro...but try it, haha.
First of all, the human ear is pretty good at noticing when things sound unreal. In technical terms, putting a volume pedal post distortion and expecting it to sound like a cranked amp is illogical. That'd be the equivalent of consistently turning up and down the master on your amp for different sections of the song. Which sounds terrible. You don't need to have that sort of automation. It doesn't sound real - when you get quieter, your guitar should have less distortion, not the same amount! That's how tube amps work!
Second, some guitarists say "well I want it for swells." Okay, so why can't you do that pregain? In my experience, not only does it sound much more exciting and grabbing when the swell slowly increases in drive as it increases in volume, it also allows for more subtle swelling. If you have distortion on and your volume pedal is post distortion, even pushing up the pedal a little bit will have that much distortion, which sounds really lame. It's impossible for you to have that much gain at that low of a volume....unless it's a pedal. Generally speaking we don't want our pedals to sound like pedals, we want them to sound like different varieties of amp-like drive. Try putting the pedal pregain and listening to how much cooler and how much more exciting swells sound, and how much more control you have over the swell intensity.
Similarly, guitarists say "I use it for fade outs!" Well, if you want the actual sound of a fade out, why not just let the guitar ring out? Do you really have that much distortion on or that much guitar sustain where it's not going to fade naturally? I find that the true nature of the "fade out" is that of ringing out the chord. That means the gain decreases as the volume decreases. Not "gain stays full blast" and volume decreases. That doesn't sound natural at all. If you put your volume pedal pre gain, you can slowly back down the gain until your tone is silent.
To me, it makes much more sense to use the volume pedal like the volume pot on your guitar, adding more gain as you dig in and less as you back it off. It's my contention that the only reason you need a volume pedal post distortion is to silence your rig, which can be done with a $15 mute pedal (easy to make).
Then guitarists say "what about when I need to kick on a higher volume for lead and lower for rhythm?" First, I could make the argument that a good arrangement and a good band will let you have plenty of room to solo without boosting your volume by double. HOWEVER, If you need separate volumes for rhythm and lead, here are a few solutions.
1. Use two different drives, set your amp to lead volume (let's say pedal B), and then set the other pedal to rhythm volume (pedal A). This is a good solution because unless you have a super high headroom amp, boost pedals don't add volume, they just add gain. Anything under about 30 watts (depending on the circuit) will just drive more as you push more into it, and rightfully so, that's how they are designed! However, for leads, we don't usually want this. So, set your amp to your lead tone, (if you must, leave your boost on while doing this) and then turn the boost off for rhythm.
2. If you don't have two drives, or if you like the sound of your drives individually and don't want to have one for lead and one for rhythm, it makes much more sense to build or buy a passive attenuator pedal. I started making these for guitarists and friends I knew for about $50. Basically the idea is that it's a single pedal with a volume knob on it. When you flip the pedal on, it turns you down. That way, you have the exact same tone for rhythm that you have for lead, just quieter. No difference in gain. No difference in tone, totally passive and true bypass, and it's in a small ZVEX size box that fits on any board at the last of the chain.
Sure, if you have the patience to use your volume pedal as post gain and your volume knob on the guitar is pregain, go for it. This is fine! I'm not saying that this is bad, I am saying that when you leave your guitar knob full blast and never touch it, and use the volume pedal for section by section dynamics, or swells, or whatever, it doesn't sound right. I've recorded hundreds of guitar players and tried it all different ways. It always sounds better pregain.
I challenge you to TRY it with the volume pedal pregain. You might hate it, but if you don't, what you may realize is how much more natural it sounds, how much more freeing it is, and how much more you have to focus on your playing, that is, play quieter for quieter sections, don't just turn down the volume--that's lazy! It really helps train your ear to start dynamic playing at the strings, not at the feet.
Don't just take it from me - take it from the greatest guitarists of our time, who didn't need pedals, they just needed good playing, good guitars, and good amps. More gain? Turn up your volume knob. Less gain? You get the picture. Most of the best guitarists I've ever heard use two amps, one clean, one distorted, with an ABY box to use clean, dirty, or both.
Like I said, this is just my opinion.
Just one more day in the pursuit of tone.
Saturday, March 3, 2012
Tuesday, February 14, 2012
Session Development
Doing some teaching at a local recording program at a tech school today. One thing I notice about the students is that they have a hard time using their time wisely - they debate things, stand around, spend forever setting up. There's not a sense of urgency. Now it's one thing to be a student trying to waste time during courses like physics, European history, or Tax Law II....but recording? Hmm...
Moral of the story is simply this - one of the things books never teach you is how to conduct a session. It's generally a fast paced experience, and rightfully so - most of the time bands are paying by the hour. And like anything, practice makes perfect. The faster you are at running around your studio solving problems, finding solutions, making things happen, the faster you will be to solve problems when they arise...because they invariably will. Most bands appreciate it when they see the engineer zipping around getting things ready. It really helps if the engineer has an intern or assistant for the session - that makes things run even smoother and faster.
I did a session recently where one of my interns was working with the drummer while the guitarist and I were laying down a scratch track. We walk into the other room and we start setting up drum stuff. With two guys it takes a fraction of the time. After the drums are recorded, I go into the CR to work with the bassist. Bassist does three or four takes and we move on to guitars. By this time, my intern had torn down the drum mics, the cables, packed everything away and hung up all the cables and headphones. We walk into the other room and start experimenting with guitar amps, free to move them about and use whatever mics and cables we need. We go back into the other room to do some backing vocals, and by the time the song is done, my intern comes in the room and says it's all clean. The band leaves, me and my intern leave, and the studio has already been cleaned. Now THAT is a smooth, professional workflow.
It's impressive to bands! They want their session to run smoothly, efficiently, and effortlessly. The more elements that you can eliminate that inhibit the creative process...the better.
Wednesday, February 1, 2012
Compression 101 - In Plain Words
Hey friends. I recently got the chance to do some compression tests. I really wanted to see what the compressor was doing to the digital waveform in order to explain it better to others and just to reinforce my understanding of compression. You can never really say you know it all - you're always going to learn new things.
Compression is sort of a mystical topic for many people. They don't really know what it does, or they kind of hear it, or they don't really know how to not abuse it. It's a delicate tool but it's certainly our most important tool for manipulating dynamics, feel, and punch. So let's break it down into simple terms so we can see what compressors actually do.
Ratio - A ratio of X:1 - for every X decibels that comes in, only 1 decibel will come out. Increasing the ratio is like strengthening the compressor's clamping power. If you imagine a compressor as being a bungee cord - a lower ratio will be a looser cord, and a higher ratio would be a tighter cord that stretches less.
Attack time - When the audio passes BELOW the set threshold, this is the time it takes the compressor to reduce the sound to its calculated amount (based on the ratio). Adjusting this fast or slow changes the sound of the "attacks" of the notes - but almost in reverse. A fast attack comp setting will chop off the front of a snare hit. A slow attack comp setting will let the hit pass, and compress what's after the hit.
Release Time - once the audio passes ABOVE the threshold, this is the time it takes the compressor to return to original (unprocessed) volume. The release really affects the sound of the sustain of the notes. A fast release will stop compressing, thereby returning the signal to normal volume, thereby raising the level of the sustain. A slow release will slowly release the gain reduction, meaning it stays quieter longer, meaning the sustain will be quieter.
Limiting / Saturation - These two types of compression are delicate matters. You can use them to your advantage to control dynamics without sounding like a compressor. If overused, both can seriously damage the sound. Look at the chart below for more info.
Aside from all other aspects these are the basic parts of a compressor, and you should learn to hear what they do. Let's put this information in two separate charts so you can really understand how these pieces of the puzzle interact.
CLICK THE PHOTOS TO ENLARGE. Use them, read them, enjoy them!
Compression - Attack / Release Times

Compression - Ratio / Compression Types

Subscribe to:
Posts (Atom)