Saturday, March 3, 2012

Tuesday, February 14, 2012
Session Development
Doing some teaching at a local recording program at a tech school today. One thing I notice about the students is that they have a hard time using their time wisely - they debate things, stand around, spend forever setting up. There's not a sense of urgency. Now it's one thing to be a student trying to waste time during courses like physics, European history, or Tax Law II....but recording? Hmm...
Moral of the story is simply this - one of the things books never teach you is how to conduct a session. It's generally a fast paced experience, and rightfully so - most of the time bands are paying by the hour. And like anything, practice makes perfect. The faster you are at running around your studio solving problems, finding solutions, making things happen, the faster you will be to solve problems when they arise...because they invariably will. Most bands appreciate it when they see the engineer zipping around getting things ready. It really helps if the engineer has an intern or assistant for the session - that makes things run even smoother and faster.
I did a session recently where one of my interns was working with the drummer while the guitarist and I were laying down a scratch track. We walk into the other room and we start setting up drum stuff. With two guys it takes a fraction of the time. After the drums are recorded, I go into the CR to work with the bassist. Bassist does three or four takes and we move on to guitars. By this time, my intern had torn down the drum mics, the cables, packed everything away and hung up all the cables and headphones. We walk into the other room and start experimenting with guitar amps, free to move them about and use whatever mics and cables we need. We go back into the other room to do some backing vocals, and by the time the song is done, my intern comes in the room and says it's all clean. The band leaves, me and my intern leave, and the studio has already been cleaned. Now THAT is a smooth, professional workflow.
It's impressive to bands! They want their session to run smoothly, efficiently, and effortlessly. The more elements that you can eliminate that inhibit the creative process...the better.
Moral of the story is simply this - one of the things books never teach you is how to conduct a session. It's generally a fast paced experience, and rightfully so - most of the time bands are paying by the hour. And like anything, practice makes perfect. The faster you are at running around your studio solving problems, finding solutions, making things happen, the faster you will be to solve problems when they arise...because they invariably will. Most bands appreciate it when they see the engineer zipping around getting things ready. It really helps if the engineer has an intern or assistant for the session - that makes things run even smoother and faster.
I did a session recently where one of my interns was working with the drummer while the guitarist and I were laying down a scratch track. We walk into the other room and we start setting up drum stuff. With two guys it takes a fraction of the time. After the drums are recorded, I go into the CR to work with the bassist. Bassist does three or four takes and we move on to guitars. By this time, my intern had torn down the drum mics, the cables, packed everything away and hung up all the cables and headphones. We walk into the other room and start experimenting with guitar amps, free to move them about and use whatever mics and cables we need. We go back into the other room to do some backing vocals, and by the time the song is done, my intern comes in the room and says it's all clean. The band leaves, me and my intern leave, and the studio has already been cleaned. Now THAT is a smooth, professional workflow.
It's impressive to bands! They want their session to run smoothly, efficiently, and effortlessly. The more elements that you can eliminate that inhibit the creative process...the better.
Wednesday, February 1, 2012
Compression 101 - In Plain Words
Hey friends. I recently got the chance to do some compression tests. I really wanted to see what the compressor was doing to the digital waveform in order to explain it better to others and just to reinforce my understanding of compression. You can never really say you know it all - you're always going to learn new things.
Compression is sort of a mystical topic for many people. They don't really know what it does, or they kind of hear it, or they don't really know how to not abuse it. It's a delicate tool but it's certainly our most important tool for manipulating dynamics, feel, and punch. So let's break it down into simple terms so we can see what compressors actually do.
Ratio - A ratio of X:1 - for every X decibels that comes in, only 1 decibel will come out. Increasing the ratio is like strengthening the compressor's clamping power. If you imagine a compressor as being a bungee cord - a lower ratio will be a looser cord, and a higher ratio would be a tighter cord that stretches less.
Attack time - When the audio passes BELOW the set threshold, this is the time it takes the compressor to reduce the sound to its calculated amount (based on the ratio). Adjusting this fast or slow changes the sound of the "attacks" of the notes - but almost in reverse. A fast attack comp setting will chop off the front of a snare hit. A slow attack comp setting will let the hit pass, and compress what's after the hit.
Release Time - once the audio passes ABOVE the threshold, this is the time it takes the compressor to return to original (unprocessed) volume. The release really affects the sound of the sustain of the notes. A fast release will stop compressing, thereby returning the signal to normal volume, thereby raising the level of the sustain. A slow release will slowly release the gain reduction, meaning it stays quieter longer, meaning the sustain will be quieter.
Limiting / Saturation - These two types of compression are delicate matters. You can use them to your advantage to control dynamics without sounding like a compressor. If overused, both can seriously damage the sound. Look at the chart below for more info.
Aside from all other aspects these are the basic parts of a compressor, and you should learn to hear what they do. Let's put this information in two separate charts so you can really understand how these pieces of the puzzle interact.
CLICK THE PHOTOS TO ENLARGE. Use them, read them, enjoy them!
Compression - Attack / Release Times


Compression - Ratio / Compression Types


Friday, January 27, 2012
Yamaha NS-10 / NS10M Review
So, I made a post a long time ago about NS10s and how mixing on computer speakers was very similar. The truth is, it really is. I finally got the chance to purchase my OWN pair of NS-10M speakers. I was very pleased.
To my ears, they are not harsh. They are not "brittle" or "bright" like some people say. I guess if your mixes are terrible, maybe they would sound that way. To me, if I had to describe the NS10s in one word, it would be "boring." I'll give you a few reasons as to why these monitors work for me:
1. They are not punchy. This is primarily because the woofer is folded paper that is very stiff and doesn't have much give to it. By having this stiff cone, the frequency response suffers (which is the point) but they are very quick in terms of fall time, and they don't push a lot of air. This helps because you can really just focus on tones and carving holes in the mix rather than being distracted by things popping out of the speakers.
2. They cannot take much power. This causes you to mix quietly -- if you weren't already. I mix VERY quietly already so this was an easy transition. Mixing quietly not only trains your ears to listen more carefully, it causes much less fatigue over long mixing sessions, and it allows you to really get in the zone with the mix.
3. They have a limited frequency response. They are not very effective below about 100hz and above maybe 5k. Bass guitars, kicks, and body from acoustic instruments won't show up too much in these. This is good because in most consumer systems, the frequency response isn't that fantastic, so you need to make sure the kick and bass can be reproduced in a 1" MacBook speaker, you know? If there's not enough midrange information in these instruments then they disappear in smaller speakers completely. It also helps with focus because you're not really being excited by a big bottom or sparkly top.
So you might be saying, "THOSE ARE THE GOOD THINGS?" Yes. There comes a time when you have to be honest about your process and just realize that putting these restrictions on yourself actually HELPS you mix better. Go figure!
Like I've said before, the NS10s are not magic speakers. They aren't going to all of a sudden make your mixes perfect. However, there is something to be said about the fact that many of our favorite records have been mixed on them. With this logic, we could infer that by mixing on the NS10s, we are setting ourselves up to make similar EQ cuts and boosts that our mixing heros would have made on guitars, basses, drums, vocals, etc. in order to get them to fit in a mix and sound good on these monitors. That is my theory, at least.
There are a few downsides to the NS10s.
1. They are ugly. Okay, obviously nothing I can really complain about. Don't get me wrong, they're just sort of an eye sore when it comes to modern studio equipment. Since they're not made anymore you are invariably going to get a pair that is used and somewhat beat up. They look very "old" and the cones are sort of dirty and off white. Vibe? I don't know. Sitting next to my Focals they look like a joke, haha.
2. They are much bigger than I realized. Their dimensions are 15" x 8.5 " x 7.5 " (HWD) and they take up a lot of space, especially when sitting sideways. It's sort of a pain to get any other nearfields to share space with them.
3. They are passive, which is a two edged sword. On one hand, you can customize the amp and get a very nice one and use it for other passive monitors in the future. On the other hand, when you buy them, you have to make sure and have all the appropriate impedence outs on the amp, make sure they are balanced, make sure they are wired correctly, etc. Sort of like setting up a home stereo, really. I am spoiled by plugging in a Passive monitor and starting right away. You can't really take NS10s to another studio easily because you have to bring an amp, speaker wire, and also, these huge ugly monitors.
My overall review? I love them. I don't find them annoying to mix on. After ten minutes, you're used to their response and you don't even think about it. You really can focus on the midrange and making sure everything has a spot and nothing is stepping on anything else. I could mix on them for hours and flip back and forth between a nice set of Focals and be totally content.
A DAY IN THE LIFE OF STUDIO MONITORS:
This is becoming my standard mixing practice:
Hours 1 - 2 : Discovery of the mix. Listening to parts, all together, then individually, thinking of the song's intent, making rough balances, pans, etc. This is done on the Focals (or any high quality full range speaker). Starting to get some feel for the song, do my groupings and gain staging, set up the mix for the real stuff.
Hours 3 - 4 : Processing phases. Starting to get compression, delay, and other effects on the tracks. Not much EQing here other than high pass filters and low pass filters. Maybe some obvious things like "problems" that I hear, but nothing drastic. Not really trying to shape things yet, just filtering out unwanted lows, compressing, and giving things a space to sit. Still working on the full range speakers because of the HPF and Compression work - needs a detailed speaker. At the end of this time frame I'll add my master bus processing and tweak that for a while. After this is done (even though it's 50% through the mix's lifetime) it's actually sounding more like 70% done. There are still fine tweak to make but the base of the song is there.
Hours 5 - 6 : Carving and shaping phase with the NS10s. Spending a few hours getting tracks fitting together tonally with the NS10s. Fine tuning levels and balances, getting everything tight frequency wise and not worrying too much about frequencies below maybe 150 and above maybe 4k. Primarily working focusing on the 200 - 4k region, and even more specifically, really looking at the 400-2.5k region. That's where most instruments build up.
Hours 7 - 8+ : Finalizing phase. From this point I am switching between the Focals, the NS10s, a boombox, an Ipod Dock, and computer speakers to make sure I'm maintaining perspective on the mix. It's sounding good even on the lowest quality system. My biggest test lately has been the laptop speaker. These are probably the worst sounding speakers on the market right now - virtually no low end, and about 1" in diameter. Very bright. Very harsh. If the mix still sounds good and you can still hear chord changes and kick hits in these speakers, your mix is probably shaped REALLY well.
When I send the mixes to clients, I'll have them listen to them, and depending on what the changes are, I usually am mixing almost exclusively on NS10s for making corrections. They are usually things like "kick needs to be punchier" or "kick too punchy," or "toms need more power" or "guitar is too bright" or "....too loud" or "too soft". These changes are very simply and often only take 30 minutes to an hour per mix to completely solve. After this mix, I'll send them another copy and if there are no final debates, it goes on to mastering.
If I am the one mastering it, I master it exclusively with the Focals / full range monitors. This is to get the big picture perspective back together and hear it full range. I will also switch between systems and check it in the car at this phase.
So that's a day in the life of my NS10s.
K
To my ears, they are not harsh. They are not "brittle" or "bright" like some people say. I guess if your mixes are terrible, maybe they would sound that way. To me, if I had to describe the NS10s in one word, it would be "boring." I'll give you a few reasons as to why these monitors work for me:
1. They are not punchy. This is primarily because the woofer is folded paper that is very stiff and doesn't have much give to it. By having this stiff cone, the frequency response suffers (which is the point) but they are very quick in terms of fall time, and they don't push a lot of air. This helps because you can really just focus on tones and carving holes in the mix rather than being distracted by things popping out of the speakers.
2. They cannot take much power. This causes you to mix quietly -- if you weren't already. I mix VERY quietly already so this was an easy transition. Mixing quietly not only trains your ears to listen more carefully, it causes much less fatigue over long mixing sessions, and it allows you to really get in the zone with the mix.
3. They have a limited frequency response. They are not very effective below about 100hz and above maybe 5k. Bass guitars, kicks, and body from acoustic instruments won't show up too much in these. This is good because in most consumer systems, the frequency response isn't that fantastic, so you need to make sure the kick and bass can be reproduced in a 1" MacBook speaker, you know? If there's not enough midrange information in these instruments then they disappear in smaller speakers completely. It also helps with focus because you're not really being excited by a big bottom or sparkly top.
So you might be saying, "THOSE ARE THE GOOD THINGS?" Yes. There comes a time when you have to be honest about your process and just realize that putting these restrictions on yourself actually HELPS you mix better. Go figure!
Like I've said before, the NS10s are not magic speakers. They aren't going to all of a sudden make your mixes perfect. However, there is something to be said about the fact that many of our favorite records have been mixed on them. With this logic, we could infer that by mixing on the NS10s, we are setting ourselves up to make similar EQ cuts and boosts that our mixing heros would have made on guitars, basses, drums, vocals, etc. in order to get them to fit in a mix and sound good on these monitors. That is my theory, at least.
There are a few downsides to the NS10s.
1. They are ugly. Okay, obviously nothing I can really complain about. Don't get me wrong, they're just sort of an eye sore when it comes to modern studio equipment. Since they're not made anymore you are invariably going to get a pair that is used and somewhat beat up. They look very "old" and the cones are sort of dirty and off white. Vibe? I don't know. Sitting next to my Focals they look like a joke, haha.
2. They are much bigger than I realized. Their dimensions are 15" x 8.5 " x 7.5 " (HWD) and they take up a lot of space, especially when sitting sideways. It's sort of a pain to get any other nearfields to share space with them.
3. They are passive, which is a two edged sword. On one hand, you can customize the amp and get a very nice one and use it for other passive monitors in the future. On the other hand, when you buy them, you have to make sure and have all the appropriate impedence outs on the amp, make sure they are balanced, make sure they are wired correctly, etc. Sort of like setting up a home stereo, really. I am spoiled by plugging in a Passive monitor and starting right away. You can't really take NS10s to another studio easily because you have to bring an amp, speaker wire, and also, these huge ugly monitors.
My overall review? I love them. I don't find them annoying to mix on. After ten minutes, you're used to their response and you don't even think about it. You really can focus on the midrange and making sure everything has a spot and nothing is stepping on anything else. I could mix on them for hours and flip back and forth between a nice set of Focals and be totally content.
A DAY IN THE LIFE OF STUDIO MONITORS:
This is becoming my standard mixing practice:
Hours 1 - 2 : Discovery of the mix. Listening to parts, all together, then individually, thinking of the song's intent, making rough balances, pans, etc. This is done on the Focals (or any high quality full range speaker). Starting to get some feel for the song, do my groupings and gain staging, set up the mix for the real stuff.
Hours 3 - 4 : Processing phases. Starting to get compression, delay, and other effects on the tracks. Not much EQing here other than high pass filters and low pass filters. Maybe some obvious things like "problems" that I hear, but nothing drastic. Not really trying to shape things yet, just filtering out unwanted lows, compressing, and giving things a space to sit. Still working on the full range speakers because of the HPF and Compression work - needs a detailed speaker. At the end of this time frame I'll add my master bus processing and tweak that for a while. After this is done (even though it's 50% through the mix's lifetime) it's actually sounding more like 70% done. There are still fine tweak to make but the base of the song is there.
Hours 5 - 6 : Carving and shaping phase with the NS10s. Spending a few hours getting tracks fitting together tonally with the NS10s. Fine tuning levels and balances, getting everything tight frequency wise and not worrying too much about frequencies below maybe 150 and above maybe 4k. Primarily working focusing on the 200 - 4k region, and even more specifically, really looking at the 400-2.5k region. That's where most instruments build up.
Hours 7 - 8+ : Finalizing phase. From this point I am switching between the Focals, the NS10s, a boombox, an Ipod Dock, and computer speakers to make sure I'm maintaining perspective on the mix. It's sounding good even on the lowest quality system. My biggest test lately has been the laptop speaker. These are probably the worst sounding speakers on the market right now - virtually no low end, and about 1" in diameter. Very bright. Very harsh. If the mix still sounds good and you can still hear chord changes and kick hits in these speakers, your mix is probably shaped REALLY well.
When I send the mixes to clients, I'll have them listen to them, and depending on what the changes are, I usually am mixing almost exclusively on NS10s for making corrections. They are usually things like "kick needs to be punchier" or "kick too punchy," or "toms need more power" or "guitar is too bright" or "....too loud" or "too soft". These changes are very simply and often only take 30 minutes to an hour per mix to completely solve. After this mix, I'll send them another copy and if there are no final debates, it goes on to mastering.
If I am the one mastering it, I master it exclusively with the Focals / full range monitors. This is to get the big picture perspective back together and hear it full range. I will also switch between systems and check it in the car at this phase.
So that's a day in the life of my NS10s.
K
Friday, December 30, 2011
New Ears Eve
Alright folks - time to learn something about your ears and analog stuff.
In a previous blog post I talked about loudness and how our ears perceive loudness from primarily average levels rather than peak levels. It's pretty interesting how that happens. We hear a certain frequency balance, a certain punch, a certain width (hmm...all words we use when describing analog gear) and it sounds LOUDER to us. More ALIVE.
Part of this is because of a little thing called saturation. Sure, compression helps aide in the squashing of dynamic range in order to bring up RMS level. You compress something 4dB and then bring up the makeup gain 4dB, the "apparent loudness" of the track easily went up 4dB because your peaks stayed the same (thanks to the makeup gain) but your average went up. But what about those times we DON'T want to use a compressor? When it sounds too obvious? When it pumps? What then!??!
Analog desks have multiple benefits. One of which is saturation. Another of which is routing possibilities. Another still is analog summing. A Big trend these days is to use analog summing mixers like the Dangerous 2Bus. This product allows mixers to send out of their DAW into an analog box that sums using components, all analog, like an analog console does. However, these boxes are usually 16 channels. An analog console is usually much larger. 24, 48, 64, 96 input boards are common. This means that you have to do digital summing in the box to get the mix down to 8 stereo groups (i.e., 16 mono outs) anyway. On a real analog console, it's easily one track per fader.
So what makes analog summing better? I used to think it was some mythical thing about width and depth and blah blah. What I've learned (at least what I THINK is happening) is the subtle saturation characteristics from each channel adds what I call a "tightening and heightening" effect. It tightens up the low end thanks to its saturation (i.e., saturation from transformers / circuitry) and it sort of livens it up due to the harmonic content added by the saturation circuitry. It's subtle. You may not notice it on a track by track basis. However, when added up together, it's sort of like the Lombard effect - people in the pub talk louder and louder as they slowly can't hear themselves over each other, and soon enough the loudness of the room is extremely obvious. Little bits add up quick.
To prove my point, take a listen to these two drum clips.
DRUM CLIP A:
http://www.theclosetstudios.com/Drumtest-A.wav
DRUM CLIP B:
http://www.thecloststudios.com/Drumtest-B.wav
Which one of these sounds more like the "analog characteristics" we talked about? More punch, apparent loudness, and width?
If you put them side by side in a DAW and play them, you will notice a few things. First, Clip A sounds a bit louder, wider, and has more depth. Listen to the room sound on clip A - it's more apparent! You hear more of the snare in the room. Now look at the meters - Clip A is 4dB QUIETER than clip B. On my meters, Clip A is -9.4 dBFS and Clip B is -6.0 dBFS.
Why does Clip A sound bigger, wider, and deeper, but it's over 3dB quieter?
Answer: ANALOG SATURATION.
Clip B was the original drum bus render. I ran it through some analog preamps and drove the transformers fairly hot. No EQ or compression, just natural saturation from analog preamps. This decreases the peaks, bringing up the harmonics and saturation, and allows for the natural compression (without pumping) to take place. This in turn yields a fuller, more balanced drum sound.
So, then after you do that, turn up Clip A 3.4dB to match the peak levels of clip B. Now guess which one is still louder? Haha...much more obvious that time.
Crest Factor is a term that means "the different between the highest peak level and the RMS level." So if your mix peaks at -1.0dB and your RMS level is -11dB, you have a crest factor of 10. Most modern standards suggest that anything more than 20dB is a super dynamic mix. Many modern rock mixes have crest factors of around 5-8dB. It is very likely that if you did a mix on an analog console and tracked to tape, your mix (DRY) would have a natural crest factor of maybe 10-12dB BEFORE compression, and a digital one may have 20+dB before compression. It is in this way that digital mixers often have to add more compression than analog mixers to compensate for this.
The solution: If you're wanting the Analog sound (like many of us are), use a healthy balance of saturation and compression. If you only use saturation, your mix will likely be out of control and probably gritty and overdriven. If you use only compression, your mix may have no edge, and instead pump and breathe in weird ways - it will sound smaller and wimpy rather than in your face.
Find a balance between saturation and compression and you will surely improve your mixes.
So the verdict on analog's depth? I don't think it's some magical "stereo widening" effect or some crazy "depth creator" even though we use the terms like "more width" and "more depth" from analog. Why is that though? I truly believe it's because of the aforementioned "tightening and heightening" effect of analog. Single tracks, entire mixes, it was obvious in the drum clip I send you above.
Another thing to think about - these days we are often using smaller rooms for recording (as many large studios have gone out) and then having to create ambience later. By running through analog gear post mix and driving it, we are essentially compressing it via saturation. When you compress something with ambience, the ambience is brought up. Note the drum example! Those were done in a big room with lots of compressed room mics. When you run it through analog, the room sound gets compressed too, making it much more obvious. This I believe is what makes a lot of "analog" mixes better. We used to record more room mics, more "real space" and now we don't, we use it on FX sends.
Another one of my solutions for this? Don't do aux sends for your room sounds. Plates, chambers, delays, sure --those have very often been aux sends. But for room sound - if you want the recording to sound REAL like it was REAL ambience recorded on those drum tracks, put the reverb ON THE TRACK. Come on, your computer is powerful enough to do that. That way when you compress them, it will react like it really would have in the analog days. Real room sound to a compressor. Sending a compressed drumkit to a room is nowhere close to compressing a big drum room stereo pair and blending it in. TRY IT.
In my opinion, the inserted reverb sounds more ALIVE. More REAL. I've been working on a book / DVD about recording and mixing for ITB and this is one of the biggest chapters in there - understanding ambience! It's not just "reverb," it's supposed to be PART of the sound. Sending the mics to an aux does very little for us. It doesn't make the room part of the recording. It makes it an effect. It doesn't make the sound quality of a space apart of what affects our EQ and compression decisions, which I 100% believe it SHOULD.
Doing it this way also allows you to be more tactile with mix. You need more verb? Turn up the ROOM MICS. Not "reach for an aux." It's more natural. Easier to remember, also.
Take these things into consideration, and have a safe new year.
In a previous blog post I talked about loudness and how our ears perceive loudness from primarily average levels rather than peak levels. It's pretty interesting how that happens. We hear a certain frequency balance, a certain punch, a certain width (hmm...all words we use when describing analog gear) and it sounds LOUDER to us. More ALIVE.
Part of this is because of a little thing called saturation. Sure, compression helps aide in the squashing of dynamic range in order to bring up RMS level. You compress something 4dB and then bring up the makeup gain 4dB, the "apparent loudness" of the track easily went up 4dB because your peaks stayed the same (thanks to the makeup gain) but your average went up. But what about those times we DON'T want to use a compressor? When it sounds too obvious? When it pumps? What then!??!
Analog desks have multiple benefits. One of which is saturation. Another of which is routing possibilities. Another still is analog summing. A Big trend these days is to use analog summing mixers like the Dangerous 2Bus. This product allows mixers to send out of their DAW into an analog box that sums using components, all analog, like an analog console does. However, these boxes are usually 16 channels. An analog console is usually much larger. 24, 48, 64, 96 input boards are common. This means that you have to do digital summing in the box to get the mix down to 8 stereo groups (i.e., 16 mono outs) anyway. On a real analog console, it's easily one track per fader.
So what makes analog summing better? I used to think it was some mythical thing about width and depth and blah blah. What I've learned (at least what I THINK is happening) is the subtle saturation characteristics from each channel adds what I call a "tightening and heightening" effect. It tightens up the low end thanks to its saturation (i.e., saturation from transformers / circuitry) and it sort of livens it up due to the harmonic content added by the saturation circuitry. It's subtle. You may not notice it on a track by track basis. However, when added up together, it's sort of like the Lombard effect - people in the pub talk louder and louder as they slowly can't hear themselves over each other, and soon enough the loudness of the room is extremely obvious. Little bits add up quick.
To prove my point, take a listen to these two drum clips.
DRUM CLIP A:
http://www.theclosetstudios.com/Drumtest-A.wav
DRUM CLIP B:
http://www.thecloststudios.com/Drumtest-B.wav
Which one of these sounds more like the "analog characteristics" we talked about? More punch, apparent loudness, and width?
If you put them side by side in a DAW and play them, you will notice a few things. First, Clip A sounds a bit louder, wider, and has more depth. Listen to the room sound on clip A - it's more apparent! You hear more of the snare in the room. Now look at the meters - Clip A is 4dB QUIETER than clip B. On my meters, Clip A is -9.4 dBFS and Clip B is -6.0 dBFS.
Why does Clip A sound bigger, wider, and deeper, but it's over 3dB quieter?
Answer: ANALOG SATURATION.
Clip B was the original drum bus render. I ran it through some analog preamps and drove the transformers fairly hot. No EQ or compression, just natural saturation from analog preamps. This decreases the peaks, bringing up the harmonics and saturation, and allows for the natural compression (without pumping) to take place. This in turn yields a fuller, more balanced drum sound.
So, then after you do that, turn up Clip A 3.4dB to match the peak levels of clip B. Now guess which one is still louder? Haha...much more obvious that time.
Crest Factor is a term that means "the different between the highest peak level and the RMS level." So if your mix peaks at -1.0dB and your RMS level is -11dB, you have a crest factor of 10. Most modern standards suggest that anything more than 20dB is a super dynamic mix. Many modern rock mixes have crest factors of around 5-8dB. It is very likely that if you did a mix on an analog console and tracked to tape, your mix (DRY) would have a natural crest factor of maybe 10-12dB BEFORE compression, and a digital one may have 20+dB before compression. It is in this way that digital mixers often have to add more compression than analog mixers to compensate for this.
The solution: If you're wanting the Analog sound (like many of us are), use a healthy balance of saturation and compression. If you only use saturation, your mix will likely be out of control and probably gritty and overdriven. If you use only compression, your mix may have no edge, and instead pump and breathe in weird ways - it will sound smaller and wimpy rather than in your face.
Find a balance between saturation and compression and you will surely improve your mixes.
So the verdict on analog's depth? I don't think it's some magical "stereo widening" effect or some crazy "depth creator" even though we use the terms like "more width" and "more depth" from analog. Why is that though? I truly believe it's because of the aforementioned "tightening and heightening" effect of analog. Single tracks, entire mixes, it was obvious in the drum clip I send you above.
Another thing to think about - these days we are often using smaller rooms for recording (as many large studios have gone out) and then having to create ambience later. By running through analog gear post mix and driving it, we are essentially compressing it via saturation. When you compress something with ambience, the ambience is brought up. Note the drum example! Those were done in a big room with lots of compressed room mics. When you run it through analog, the room sound gets compressed too, making it much more obvious. This I believe is what makes a lot of "analog" mixes better. We used to record more room mics, more "real space" and now we don't, we use it on FX sends.
Another one of my solutions for this? Don't do aux sends for your room sounds. Plates, chambers, delays, sure --those have very often been aux sends. But for room sound - if you want the recording to sound REAL like it was REAL ambience recorded on those drum tracks, put the reverb ON THE TRACK. Come on, your computer is powerful enough to do that. That way when you compress them, it will react like it really would have in the analog days. Real room sound to a compressor. Sending a compressed drumkit to a room is nowhere close to compressing a big drum room stereo pair and blending it in. TRY IT.
In my opinion, the inserted reverb sounds more ALIVE. More REAL. I've been working on a book / DVD about recording and mixing for ITB and this is one of the biggest chapters in there - understanding ambience! It's not just "reverb," it's supposed to be PART of the sound. Sending the mics to an aux does very little for us. It doesn't make the room part of the recording. It makes it an effect. It doesn't make the sound quality of a space apart of what affects our EQ and compression decisions, which I 100% believe it SHOULD.
Doing it this way also allows you to be more tactile with mix. You need more verb? Turn up the ROOM MICS. Not "reach for an aux." It's more natural. Easier to remember, also.
Take these things into consideration, and have a safe new year.
Tuesday, December 27, 2011
Mixerman Quote
LOVE these tidbits from Mixerman....it could be pure genius at a momentary break in the song, and pure crap everywhere else."
"So if you bring up a part and it does nothing good for the track, provides no worthwhile counter-melody, serves only to distract the listener's focus from what's important, or offers no valuable rhythmic support, it's a stranded part, one that should have long ago been removed from the session. Underdub it."
"Since the vocal (or melody) is the most important part in a mix, you should make the preponderance of your tough decisions based on how a part affects the vocal"
"Remember, at all times, you're attempting to push the listener forward, manipulate their focus, and cause them to have an involuntary physical reaction to the music this will cause the listener to sing the song, which consequently will lead them to want to hear the track again."
-Mixerman
from Zen and the Art of Mixing
Seriously, buy this book:
http://www.amazon.com/Zen-Art-Mixing-Mixerman/dp/1423491505/ref=sr_1_1?ie=UTF8&qid=1325558225&sr=8-1
"So if you bring up a part and it does nothing good for the track, provides no worthwhile counter-melody, serves only to distract the listener's focus from what's important, or offers no valuable rhythmic support, it's a stranded part, one that should have long ago been removed from the session. Underdub it."
"Since the vocal (or melody) is the most important part in a mix, you should make the preponderance of your tough decisions based on how a part affects the vocal"
"Remember, at all times, you're attempting to push the listener forward, manipulate their focus, and cause them to have an involuntary physical reaction to the music this will cause the listener to sing the song, which consequently will lead them to want to hear the track again."
-Mixerman
from Zen and the Art of Mixing
Seriously, buy this book:
http://www.amazon.com/Zen-Art-Mixing-Mixerman/dp/1423491505/ref=sr_1_1?ie=UTF8&qid=1325558225&sr=8-1
Saturday, December 24, 2011
Review of the URS Classic Console Strip Pro v2.0
 click to enlarge
Alright...so I picked up this baby yesterday and I must say, Whoa.
This plugin is NUTS. The idea behind it is to model the EQ / "coloration" characteristics of all these different types of input stages, compressors, and EQs, and put them all into one plugin that is a channel strip of all three. Enter URS Console Strip Pro. Though it doesn't look all that fancy, it's a great sounding plugin that does a LOT for only $300.
Jeez. Where to start.
I heard about this plugin from two main producers. One was Charles Dye, who is the first engineer to have a number one record that was completely mixed in the box. He's sort of a plugin legend.
The Plugin
Alright so let's talk about the plugin. According to the URS website, this is what all the plugin plugin models in the input stages:
- Three Class A American input transformers
- Class A British input transformer
- Class A German input transformer
- Two Class A tube input stages
- 15ips 2" tape electronics/head bump
- 30ips 2" tape electronics/head bump
- 30ips 1/2" tape electronics/head bump
- Fifteen input transformer & tape combos
- Five Console Input/Summing Buss stages
The EQ is laid out with 5 different models of EQ across 4 bands. The models are:
1951 - Pultec Style
1967 - API Style
1970 - Neve 1073 Style
1972 - Neve 1081 Style
1980 - SSL Style
The characteristics of these EQ curves really are noticeable when boosting or cutting a lot. If you set a boost in the lows or low mids to 4 or 6 dB and then switch through the different presets, you can hear the difference. It's subtle, but it's definitely there. The Pultec has a nice big bottom and smooth top, the Neves have a really tight low end and upper midrange boost, and the SSL has the classic edgy top. API doesn't really sound like the API to me, but it's still a good EQ.
You can arrange the EQ and compressor in a few ways. EQ first, Compressor first, Filters first, or all different combinations of those three. You can also bypass parts completely, or individual EQ bands only. You can link all the EQ "types" together using the Link button on the HF band. In addition to the EQ section you have the filters section for HPF and LPF, which I usually put pre compressor, and I love using them to tighten up the sound and remove any extraneous sounds I don't want to compress.
The compressor side is really what makes this thing cool. It has SIXTY presets for compression. Yes, SIXTY. This includes things like LA2, 1176, Distressor, API 525, Fairchild, VariMu, etc. I personally think that is too much, but it does allow you to get quick sounds. Apparently these are not only modeled after the EQ curves of the piece of gear, but when you open a preset it adjusts the ratio / attack / release / release type (manual or 7 different auto modes) to fit the sound of the compressor. In addition to these, you can adjust for the "faster attack" switch, adjust the knee, and the gain makeup. The one thing I dislike is that it is totally dependent on the types of models, and there is no ratio control, so you sort of have to know what you're wanting in order to get a sound without tweaking many knobs. However, some would argue this makes you use your ear more. I can see that.
Probably my favorite part about the compressor section is that in V2 of this plugin (which I have) there is a Wet/Dry mix control for the compressor. This allows you to do parallel compression in real time with no phase issues from DAWs that don't have automatic delay compensation.
Some side notes - I LOVE that this plugin has input and output meters separately, as well as a gain reduction meter. I hate having to select what I want to see on the meter, I want to see all three! MAN that makes it easy for gain staging. The plugin operates very smoothly with your mouse and keyboard. Holding control will give you large knob turns as you scroll your mouse wheel. Releasing it will give you normal precision, and holding shift will give you fine precision.
The saving grace of this plugin to me was the presets. Once I got it I was like "oh man, I have no idea where to even start." The first five presets in the plugin are modeled by year, which select all the EQs to the same year, and then select a compressor / input stage that would match that year. Then they also have tape and tube compression presets. This is a nice place to start. I don't ever get into the presets about specific sources (e.g., "Rock Kick" or "Drum Bus" presets) because they NEVER work for me. Every source is different so I just use my ear.
Overall, this plugin is a REALLY great deal for $300. It comes with a lot of amazing tools in it. I think it beats out the Waves SSL channel for me, particularly because of all its features. The compression takes a little bit to get used to, but after you find a couple of models you like, you will find it really addicting. I just wish it wasn't ugly as hell.
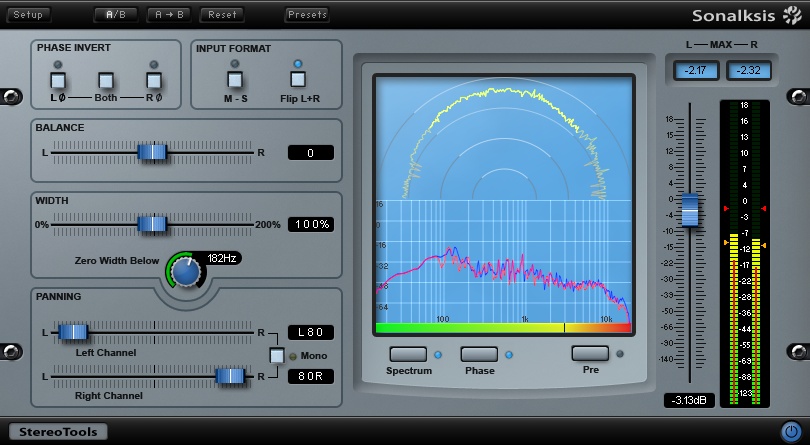
Review of the Sonalksis Stereo Tools
 (click to enlarge)
Alright, so I'm new to this brand called Sonalksis, (I believe pronounced Son-aulk-sis), which is this smaller plugin company that makes a handful of really need plugins. I recently found out about them from reading an interview with a producer I like, and I decided to head over to their website. After many hours, I ended up getting the 14 day trials for almost all of their plugins, and I ended up purchasing the Sonalksis STEREO TOOLS plugin.
This is a very simple plugin for adjusting stereo width in sources, similar to the Waves S1 or one of my personal (and free) favorite plugins, the Omnisone stereo imager by jb. However, this has a couple features that really make it shine.
First of all, there is a phase invert switch on the top left of the plugin for the Left, Right, or Both. This can be useful when dealing with any stereo pair of mics as a quick check before and after you do stereo image processing. Sometimes making the stereo image narrower will make imaging problems more obvious. You also have Mid-Side input or standard left and right, as well as a "flip left and right" button. In the main part of the plugin we have Balance (like a pan pot) and then WIDTH. Our main focus! This width has a really cool feature about it in that you can select "Zero Width Below" and you basically have a high pass filter. This is AMAZING for putting this across the stereo bus, because you can select the filter down to maybe 80 or 100hz, and nothing below that will be shifted to the outsides, they will be shunted to mono. Now this is usually not a problem because the only things that are in that region are already mono! (kick, bass, etc).
However, this becomes really cool on things like acoustic guitars, which can start to sound really weird if you make them too wide. What I have done so far is put the HPF on to maybe 100-200hz, and just let the width stay at 100%. That way, I have my normal wide stereo image for acoustic, but my low end is solid in the middle.
There is also a stereo panning section that allows you to pan the left and right channels yourself rather than just having a single balance fader. In addition, there is a Mono button that simply allows you to keep it mono.
One of my favorite parts of this plugin is that is had a great Phase scope, Frequency Analyzer, and Lissajous meter. These three things make it really useful for gauging the size and shape of the mix when placed on the stereo buss (which honestly I find that I like a whole lot!) I don't always do stereo widening on the 2bus, but I find that digital doesn't always have the width and depth that analog has, so you have to be a lot more creative with your mixing to create
My only qualm about the plugin is that sometimes it seems to take away some low end from the source, and there is no readjustment for adding low end back, which I think should be on a new update.
Aside from the Stereo Tools plug, my favorites were the Sonalksis SV314 Compressor and the Sonalksis Creative Filter. Some of their plugins I found to be difficult to use, very hard to read, too much on the screen, like their two multiband dynamics plugins. I did really like their gate plugin, but there was no Floor adjustment, which bothers the heck out of me; I never gate to zero because it sounds too unnatural.
So this is a great plugin! If you need a solid stereo imager and want something useful, check out the Sonalksis StereoTools. If you don't have the money for it, get JB Omnisone.
Monday, December 19, 2011
Balance is a Virtue
Alright so what's up with the title of the post - let's talk about balance for a minute. This upcoming RECORDING LOUNGE PODCAST episode is about getting things to fit in a mix using reverb, compression, and EQ. Figured I'd share a story about this.
The time was last week, some late weeknight, and I'm working on a mix. At that time I had drums and bass grooving together, guitars starting to work, and the vocals in the verses. I kept looping the verse and working on that and it sounded awesome. Eventually I got to a point where I said, man I love this verse. Time to move on to the chorus. The chorus had a different selection of certain parts (different guitars, different pads) so I was trying to mix those all in with the already solid drums and bass.
The problem I began having was that the chorus just did - not - work. I kept blaming the parts. This guitar part isn't working, so I'd mute it and then the chorus would sound empty. Then I thought, okay maybe it's just too loud, so I turned it down. Then that didn't work. So then I started messing with the EQ. The part I was really having trouble with was this guitar part that was subtle but added a lot to the chorus live. When it was recorded, it just was not working.
I decided to take a different approach. I muted the guitar part and just listened to the chorus. Nice pretty highs, nice powerful lows, but the mids seemed to be a bit empty, and it was primarily in the 400-1k range, which we generally think of as boxiness. It wasn't that I had filtered out too much on other instruments, it was just like someone in the band wasn't playing that was supposed to be - that's literally how it sounded!
Now, this guitar part was sort of a chimey guitar that sounded amazing on its own, but in the mix just didn't work. What I decided to do was reamp the guitar part through a wah pedal and a dark tube amp and got this dark murky filtered sound with virtually no top end and very little bottom end. When put back in the mix, the chorus sounded amazing.
Why was that? Well, when I listened to the chorus without the guitar part and liked the balance but it seemed to miss something in the mids. The guitar part was chimey so lots of pretty highs and beautiful bell like high mids. But no body. Darkening it up with the wah did change the band's "intent" of that part, however, it made the chorus really gel together. It taught me something really great about balance.
Moral of the story: balance is not an individual track by track feat. It's not all about volumes (loud and soft) and pans (left to right), it's also about depth (front to back) and microdynamics (percussive performance vs. smooth performance) as well as tonality (EQ and part selection). When you listen to songs or sections of songs, try to listen to what is "missing" in the section's makeup. If nothing is missing, you are very likely to love that section. If something is missing, it may be some gap in the highs or in the lows, maybe the bass part changed or the guitar part is weird and now there is a gap in the low mids and mids.
Try not to listen to "guitars" and "bass" and "drums" but instead listen for the EQ CURVE of the mix. Listen to what "high frequencies" are coming through as well as what "low frequencies" are coming through. Try to think of it in that way artistically and you may find your mixes changing in a great way. If you ask yourself "what's going on in the mids" you could easily list almost every track, but if you start saying "what's going on in the 500-1k region" and if there's a deficit (or a surplus) then it might sound very off.
It's not about making a mix where every frequency is represented the same volume as every other frequency. This is where the age old quote "follow the song" comes in. Each section will offer a different dynamic balance, tonal balance, and spatial balance. The more you learn to recognize these things as an artistic means to an end, the better your mixes will sound because you will mix quicker, less analytically and more creatively. Also, you will probably find yourself using less processing and EQ!
Good luck. Listen for the next podcast tonight - search iTunes for RECORDING LOUNGE
The time was last week, some late weeknight, and I'm working on a mix. At that time I had drums and bass grooving together, guitars starting to work, and the vocals in the verses. I kept looping the verse and working on that and it sounded awesome. Eventually I got to a point where I said, man I love this verse. Time to move on to the chorus. The chorus had a different selection of certain parts (different guitars, different pads) so I was trying to mix those all in with the already solid drums and bass.
The problem I began having was that the chorus just did - not - work. I kept blaming the parts. This guitar part isn't working, so I'd mute it and then the chorus would sound empty. Then I thought, okay maybe it's just too loud, so I turned it down. Then that didn't work. So then I started messing with the EQ. The part I was really having trouble with was this guitar part that was subtle but added a lot to the chorus live. When it was recorded, it just was not working.
I decided to take a different approach. I muted the guitar part and just listened to the chorus. Nice pretty highs, nice powerful lows, but the mids seemed to be a bit empty, and it was primarily in the 400-1k range, which we generally think of as boxiness. It wasn't that I had filtered out too much on other instruments, it was just like someone in the band wasn't playing that was supposed to be - that's literally how it sounded!
Now, this guitar part was sort of a chimey guitar that sounded amazing on its own, but in the mix just didn't work. What I decided to do was reamp the guitar part through a wah pedal and a dark tube amp and got this dark murky filtered sound with virtually no top end and very little bottom end. When put back in the mix, the chorus sounded amazing.
Why was that? Well, when I listened to the chorus without the guitar part and liked the balance but it seemed to miss something in the mids. The guitar part was chimey so lots of pretty highs and beautiful bell like high mids. But no body. Darkening it up with the wah did change the band's "intent" of that part, however, it made the chorus really gel together. It taught me something really great about balance.
Moral of the story: balance is not an individual track by track feat. It's not all about volumes (loud and soft) and pans (left to right), it's also about depth (front to back) and microdynamics (percussive performance vs. smooth performance) as well as tonality (EQ and part selection). When you listen to songs or sections of songs, try to listen to what is "missing" in the section's makeup. If nothing is missing, you are very likely to love that section. If something is missing, it may be some gap in the highs or in the lows, maybe the bass part changed or the guitar part is weird and now there is a gap in the low mids and mids.
Try not to listen to "guitars" and "bass" and "drums" but instead listen for the EQ CURVE of the mix. Listen to what "high frequencies" are coming through as well as what "low frequencies" are coming through. Try to think of it in that way artistically and you may find your mixes changing in a great way. If you ask yourself "what's going on in the mids" you could easily list almost every track, but if you start saying "what's going on in the 500-1k region" and if there's a deficit (or a surplus) then it might sound very off.
It's not about making a mix where every frequency is represented the same volume as every other frequency. This is where the age old quote "follow the song" comes in. Each section will offer a different dynamic balance, tonal balance, and spatial balance. The more you learn to recognize these things as an artistic means to an end, the better your mixes will sound because you will mix quicker, less analytically and more creatively. Also, you will probably find yourself using less processing and EQ!
Good luck. Listen for the next podcast tonight - search iTunes for RECORDING LOUNGE
Wednesday, December 14, 2011
Loudness and Average Level
An excerpt from a favorite book of mine:
"LOUDNESS [as a term] is used specifically and precisely for the listener's perception. Loudness is much more difficult to represent in a metering system, in fact it's best presented as a series of numbers rather than as one overall figure of "loudness." Two pieces of music that measure the same on a flat level meter can have drastically different loudness[es]. A true loudness meter makes a complex calculation using SPL, frequency content, and duration. Exposure time also affects our perception; after five minute rest, the music seems much louder, but then we get used to it again--another reason why it is wise to have an SPL meter around to keep us from damaging our ears.
Contrary to popular belief, the levels on a digital peak meter have (almost) nothing to do with loudness. Here is an illustration. Suppose you are doing a direct two-track recording and you've found the perfect mix. Leaving the faders alone, you let the musicians do a couple of takes. During take one, the performance reached -4dB on the meter, and in take two, it reached 0dB for a brief moment during a snare drum hit. Does that mean that take two is louder? No: because in general, the ear responds [most] to average levels, not peak levels when judging loudness. If you raise the master gain of take one by 4dB so that it too reaches 0.0dBFS peak, it will sound 4dB louder than take two, even through they both now measure the same on the peak meter.
An analog tape and digital recording of the same source peaked to full scale sound very different in terms of loudness. If we make an analog tape recording and a digital recording of the same music, and then dub the analog recording to digital, peaking at the same level as the digital recording, the analog dub will have about 6dB more intrinsic loudness than the all digital recording. Quite a difference! This is because peak to average ratio of an analog recording can be as much as 12-14dB compared with as much as 20dB for an uncompressed digital recording. analog tape's built in compressor is a means of getting recordings to sound louder. That's why pop producers who record digitally may have to compress or limit to compete with the loudness of their analog counterparts."
-Bob Katz, Mastering Audio: The Art and the Science
"LOUDNESS [as a term] is used specifically and precisely for the listener's perception. Loudness is much more difficult to represent in a metering system, in fact it's best presented as a series of numbers rather than as one overall figure of "loudness." Two pieces of music that measure the same on a flat level meter can have drastically different loudness[es]. A true loudness meter makes a complex calculation using SPL, frequency content, and duration. Exposure time also affects our perception; after five minute rest, the music seems much louder, but then we get used to it again--another reason why it is wise to have an SPL meter around to keep us from damaging our ears.
Contrary to popular belief, the levels on a digital peak meter have (almost) nothing to do with loudness. Here is an illustration. Suppose you are doing a direct two-track recording and you've found the perfect mix. Leaving the faders alone, you let the musicians do a couple of takes. During take one, the performance reached -4dB on the meter, and in take two, it reached 0dB for a brief moment during a snare drum hit. Does that mean that take two is louder? No: because in general, the ear responds [most] to average levels, not peak levels when judging loudness. If you raise the master gain of take one by 4dB so that it too reaches 0.0dBFS peak, it will sound 4dB louder than take two, even through they both now measure the same on the peak meter.
An analog tape and digital recording of the same source peaked to full scale sound very different in terms of loudness. If we make an analog tape recording and a digital recording of the same music, and then dub the analog recording to digital, peaking at the same level as the digital recording, the analog dub will have about 6dB more intrinsic loudness than the all digital recording. Quite a difference! This is because peak to average ratio of an analog recording can be as much as 12-14dB compared with as much as 20dB for an uncompressed digital recording. analog tape's built in compressor is a means of getting recordings to sound louder. That's why pop producers who record digitally may have to compress or limit to compete with the loudness of their analog counterparts."
-Bob Katz, Mastering Audio: The Art and the Science
Subscribe to:
Posts (Atom)